OPI - Glacier Bay Blues

Saturday, October 30, 2010
Hey everyone! How is everyone's weekend so far? Hopefully you'll get some time to relax and reload your energy for the start of the new week. I have been cleaning my Helmer again - I do this once a week but today my cleaning was more thoroughly and I stumbled upon a few polishes I forgot about. One of them was this one, OPI Glacier Bay Blues.

OPI Glacier Bay Blues

Glacier Bay Blues is an old OPI, it comes from the 2004 Canadian Collection, but it isn't that hard to find. There are some bottles to be found on eBay and apparently there are a few etailers that sell this one (but I don't have experience with any of them). Enough about this, let's go on to the colour!

Glacier Bay Blues is a blue based shimmery duochrome. When the light changes the polish changes with you, giving you purple and teal flashes. It's very pretty (and hard to photograph haha).

OPI Glacier Bay Blues

Application was okay. I like the new OPI formula more than this old one but it isn't a pain in the ass to apply. I needed four coats for this one to be opaque and I know that I use really thin coats but this is kind of... meh! I will layer this one in the future, I am already thinking of pretty combo's with OPI DS Fantasy and Misa On the Edge.

By the way! If you dislike the big brushes that OPI now has you should definitely look out for these older ones, the brush is small and will be easier to handle for some.

OPI Glacier Bay Blues

I have to say that this one is gorgeous in the bottle. GORGEOUS. Even better when it's on the nail, I could stare at it the whole day and see the colours shift. Very cool.

Thanks for visiting and enjoy the rest of your weekend!
Michelle

Quick note: I will tell you the winners of the giveaways the upcoming week!

Survey time!

Friday, October 29, 2010
Good evening all! I was getting a few questions about what my favourite and least favourite brands are and while I thought of that, I also noticed I was interested in your preferences and why. I whipped up a survey for you that everyone can fill in. This survey is anonymous and I'm the only one who can see the answers. I will leave this survey open for a little more than a week and after that I'll collect the results and share with you, making a top 5 of everything.

Again, the survey is about your most and least favourite nail polish brands and why. I have given you a few options in questions #2 and #5 but if you have anything else to add to that, you can always fill in the next question. You can also use that space to be more specific about your answers. As a bonus question something I have seen at the Lacquerista, your five most favourite nail polishes ever. I'm very curious to see if there's a different outcome.

If you have any other questions you can always ask!


Thanks for filling in the survey, I appreciate it very much! :-)
Michelle

Nfu.Oh #65

Morning everyone! I was planning to do some swatching yesterday afternoon but work took a little longer than expected. While I was looking through my nail pictures, to see if I might had something to share, I saw pictures of Nfu.Oh #65. I've never showed this one, how wrong is that?! Meet my favourite holo!

Nfu.Oh #65

Nfu.Oh #65 is a blue holo, not really really blue but more a toned down baby blue. I've showed you some before but because blue is my favourite colour, this is my favourite one. Nfu.Oh is absolutely the Queen of holographic polishes. I can't really describe how frigging cool they are, it's something you just have to see for yourself.

I've applied Nfu.Oh #65 with the Nfu.Oh Aqua Base and if you're into holo's I think this base coat is a good buy for you. You won't be disappointed because the base makes it much easier to apply holographic polishes, leaving you with a smooth finish and absolutely no bald spots. The top coat also works perfectly fine with normal polishes.

Nfu.Oh #65

Pfew! Isn't that awesome?!

I got my Nfu.Oh #65 and the Aqua Base from NailXL. They ship within Europe, if you have questions you can always contact the owner. Another web shop I have good experience with is Viis, an Estonian web shop that also ships internationally.

What's your thought of these holographic polishes? Do you like them or think it's too much?
Take care and thanks for stopping by!
Michelle

Eyeko - Military Polish

Wednesday, October 27, 2010
Eyeko Military Polish

Good afternoon all! Today I will show you the last one of the new Eyeko polishes.

Military Polish is something I can describe best as a mix between green and brown. On your nails it is darker than it looks like in the bottle, the only exception to this is when your nails hit the sun. I can imagine people being disappointed about it because in some light your nails will look nearly black, that's how dark this shade is.

Eyeko Military Polish

Application was okay. First coat was streaky but the second coat made up for it and also made it fully opaque. The polish is quite pigmented and a little on the thick side. One thing that bugged me is that while applying the polish it looked like there was sand in the polish, giving me tiny gritty spots on my nails. My friend also had that, and she has a different bottle, so what's up with that? Drying time was pretty fast and it leaves you with a very glossy finish.

If you're mad about (army)greens I'd get this one, otherwise I'd just leave it. The formula could've been better and I wish the colour on your nails was like the colour in the bottle! The colour is too dark now for my taste. I got mine from the Eyeko website for €4.00. A bottle contains 8.5ml.

How do you feel about military shades? Any thoughts about this one from Eyeko?
Michelle

Fimo Flowers

Tuesday, October 26, 2010
Hey everyone! I've been wanting to buy fimo canes for nail art purposes but never did because I thought slicing these up would be kind of an impossible task for a clumsy person like myself. Luckily for me, and everyone else that doesn't trust themselves with a razor blade, there are plenty of shops around selling pre sliced fimo pieces. One of the shops that does so and where I placed an order not too long ago is Mardy MakeUpShop, a Dutch web shop. The fimo slices variate in prices but these flowers were €1.25 for a bag of about 100 pieces. Not bad ey! I also want to say that they were fast with my order, I received it the next day. Like they personally stuffed it in my mailbox!

Fimo Flowers Nail Art Design Fimo Cane Slices

I first applied a base colour, I picked Color Club Who Are You Wearing? from Color Club's Rebel Debutante collection. It's really nice, wearable whitish creme that's leaning towards a very light type of lavender. It's very subtle and I picked it because I thought the flowers would really jump out with a base colour like this. After that I placed some random vine-like stripes and added the flowers - sticking them to my nails with a little bit of top coat.

Ados Striper

The striper was sent to me by Mardy MakeUpShop for a review and I was excited to try this one because I've never tried something from Ados. I've actually never heard of the brand before, don't know if I have been living under a rock but from first sight it looked good. I got number 27, it's a somewhat murky kind of green glitter in a transparent base. The brush is long and thin, just a normal striper brush, and the cap is long and pointed which makes it very easy to handle. The glitters are pretty dense so it doesn't leave you with spaces that don't have any glitter, I like that.

It costs €2.50 and it contains 5ml of polish. Now I know there are a lot of stripers available on eBay that can be bought for less and that's also a great buy but I have to say that I like the Ados striper more. Some of my eBay stripers smell really bad (like paint thinner?!) and the design isn't as nice. Also this one is B3F and I'm not sure if the eBay stripers are. I would buy more of these if I needed more stripers but to tell you the truth I can't stash some more in my Helmer - I got too much.

Fimo Flowers Nail Art Design Fimo Cane Slices

I'm very much in love with the fimo slices I got, they are adorable and I have ordered a lot more of these pretties. I just saw they also had Christmas themed fimo slices and I'm such a sucker for those kind of themed things so guess what you'll be seeing soon..?

Mardy MakeUpShop ships internationally. I'm very happy with a web shop like this because they offer nail art products for small prices and they also carry a lot more products so be sure to check it out.

What's your thought of fimo? Like it or not? And do you trust yourself with a razor blade?

The product in this post is provided for consideration.
For more information please read my disclaimer.

Blue Leopard

Monday, October 25, 2010
Good morning people! How was everyone's weekend? I've used my weekend to regain some energy after the busy day on Friday but I'm totally feeling good and happy to start with this new week. Strange isn't it, especially since it's Monday and normally I think that is the most terrible day of the week. Now I can't be bothered! Hope you all have the same good mood like I have! :-)

Today I want to show you all something I made a couple of weeks ago.

Blue Leopard Nail Art Design

It's a strange blue leopard design! I've seen a couple of these designs being posted on the interwebs and I think they look pretty darn cool so I decided to make one myself.

First I applied Misa Quirky Smile (pretty blue, you should get it) and applied H&M Love at First Sight on top of that (and the other way around for my pinky). After that I created the leopard spots like I showed you in my DIY Leopard Tutorial. I used the black Herôme striper and Zoya Robyn as my colours and then I used the silver Essence striper to create some silver lining. Last, it's sealed with a top coat.

This design is pretty easy to make, you just want to make sure you apply the polish in a right order (this causes less frustration) and if there's polish flooding your cuticle you can easily remove this with a small brush. If you can't create straight lines by hand you can also use tip guides - sometimes you find some with a nice shape but you can also cut some yourself - or painters tape.

Thanks for visiting!
Michelle

New from Pieces?

Sunday, October 24, 2010
Hey everyone! On Friday I also went into town and stumbled upon polishes from Pieces I had never ever seen before so to me they are new. But are they really new as in omg-new-release-wow-wow-wow!-new? I don't know, so if you can enlighten me, please do.

Pieces Nail Polish Nagellak Golden Chokolate

I picked up three colours: Ms Jagger Green, Metropolitan Sky Blue and Golden Chokolate. The last one is the one I'm showing you today!

Pieces Nail Polish Nagellak Golden Chokolate

Golden Chokolate (why are they spelling it with a K? I don't like that, I want the K to be a C!) is a dark brown based polish, absolutely packed with golden shimmer. On the picture above, that is made in normal daylight, you can see the shimmer peeping through a little but this is not that impressive when you've seen it being hit by the sun.

Pieces Nail Polish Nagellak Golden Chokolate

Voila. It's awesome, it's so glowy and such a rich colour. I think this is perfect for fall and winter! Application was pretty good, I liked the formula because it wasn't thin or thick: exactly in the middle, just how I like it. I needed three coats for this one to be opaque. The only thing I dislike, the same as I told you about Wet n Wild, is that the caps and brushes are small. I like my brushes to be long and have a cap that I can hold on to. It's not impossible to polish with these caps but it tends to bring a little more irritation haha.

Pieces Nail Polish Nagellak Golden Chokolate

I bought the three polishes at the Pieces store for €6.95. The polishes cost €2.95 each so when you want to buy more I'd buy three. It's a little cheaper. :o) It's not expensive, they offer a nice variety of colours and I don't have issues with the application so it does no harm when you want to try.

Take care and enjoy the rest of the lazy sunday!
Michelle

Catrice Preview - New Products

Saturday, October 23, 2010
Catrice Display New Collection November 2010

Hi guys! Be prepared for a long post, longer than I usually do because I have tons to show and tell you. Catrice has been working on renewing their products and on Friday they organized a day for bloggers to come and see what has changed. It ended up in a great fun day with lots of new pretty things to see and show you guys! For a full collection overview Michèle's post is incredibly nice: you can see it here.

As you can see on my first picture, Catrice changes the display a little. The new products will be found mostly in the middle so they're easy to find and they sure have been busy working on new eye and lip products!

Catrice - Mono Eyeshadow New Collection November 2010

Mono Eye Shadow

Catrice comes with 32 new, trendy eye shadows with all kinds of different finishes. From matte to glittery and even more, there is something for everyone's taste! I got six of these and I have swatched them for you. Even though I'm not a beauty queen I still think these swatches are a good indication of how they look in real life.

Catrice - Mono Eyeshadow Swatches New Collection November 2010

These swatches are made in daylight, without flash and without a base/primer.
From left to right: 110 Gilbert's Grapefruit, 220 The Violent Violet, 250 Swimming with Dolphins, 210 The Queen is Amused, 160 I Trust Stardust, 070 Mr. Copper's Fields.

Overall I think these are nice. Not only do I like to colours, they are also very pigmented and easy to blend out. The packaging is quite minimalistic and that's also a plus for me. Price: €2.79.

Catrice - Duo Eyeshadow New Collection November 2010

Duo Eye Shadow

There will be 8 of these duo eye shadows available and all of them have nice colour combinations. I have three of these to show you.
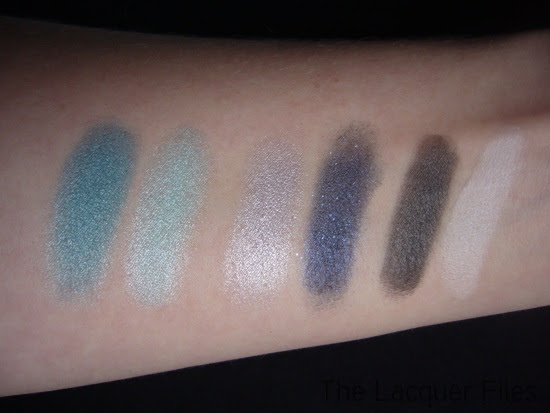
Catrice - Duo Eyeshadow Swatches New Collection November 2010

These swatches are made in daylight, without flash and without a base/primer.
From left to right: 020 Missing: Jack & Rose, 030 Once in a Blue Moon, 070 Double Espresso Macchiato, Please!

I like them! My favourite is the second duo, the blue is so glittery and wow! These are also very pigmented and easy to blend. Price: €3.79.

Catrice - Lipgloss New Collection November 2010

Lip gloss

There are two new kinds of lip glosses: Lip Appeal and the Colour Show. The Lip Appeal gloss has a moisturizing formula, gives your lips a perfect glossy look and will be available in 10 different shades. The Colour Show gloss gives a more intense colour on your lips that lasts, also will be available in 10 different colours.

Catrice - Lipgloss Swatches New Collection November 2010

These swatches are made in daylight, without flash.
From left to right: 010 Toast With Champagne (Colour Show), 060 Little Red Dress (Colour Show), 070 Berry, Berry Nice (Lip Appeal).

To tell you the truth: I like them all three. They are not that sticky nor heavily scented (I really dislike that) and the variety of colours is very nice. Little Red Dress is very pigmented as well as the other shades from the Colour Show I've tried at the preview, big plus! Price: €3.79 each.

Catrice - New Polishes New Collection November 2010

Nail polish

And of course, Nail polish, the thing that excites me the most! Catrice worked on three new shades and sweet Michèle let me borrow her picture. I promise I make swatches myself, soon!

Catrice - New Polish New Collection November 2010

As you can see Catrice comes with three new colours and a matte top coat. I don't own the green but will soon (it looked fab!) but you can expect swatches of Absolutely Chinchilly, Hip Queens Wear Blue Jeans! and the matte top coat the upcoming week or so. I can tell you already that the formula's are even better than they were! Price: €2.49 each, the Matte top coat costs €1.99.

The new Catrice products will be hitting the stores in November! I really like the new eye shadows - they are very well pigmented and Catrice offers a huge range of colours. In my opinion Catrice now shows they are one of the best budget brands around and I definitely love the changes they've made.

I had a great day Friday and I'd like to thank the people from Catrice and their PR representatives for everything. It was really nice seeing all the new products and being able to test these. It was also really nice to meet other bloggers and have a chat with them. I'm definitely not disappointed at all! :-)

Any thoughts about the new Catrice products so far? I'm curious!
Michelle

Two Pretties make a good Pair

Morning people! Today I want to show you two polishes from the new China Glaze Holiday Collection called 'Tis the Season to be Naughty and Nice. I really wanted Party Hearty from the beginning because I love these kinds of glitter but when I saw Jolly Holly I just couldn't say no. It's green and it's gorgeous, everyone would've said yes!

China Glaze Jolly Holly Party Hearty 'Tis the season to be naughty and nice holiday 2010

This is Jolly Holly, an amazing green shimmery polish. The shimmer is blue and gold and it's awesome! Application was really good and it was also opaque after one coat. ONE COAT!

China Glaze Jolly Holly Party Hearty 'Tis the season to be naughty and nice holiday 2010

Jolly Holly topped with one coat of Party Hearty, no top coat. Party Hearty is such a funky glitter! I can see small silver and gold glitter and they've also put larger red and green glitter in it, all in a clear base. Application wise it was good, I don't like to polish my nails with glitters but this one wasn't that uncontrollable.

The 2010 Holiday Collection from China Glaze also offers you some sweet gift sets that are available at Trans Design and will be at Enchantra. How do you feel about this new Holiday collection?

Thanks for stopping by!
Michelle

Mmmmorbid

Thursday, October 21, 2010
Morning guys! I hope everyone's fine. Today will be a super quick post, even I am surprised about it because normally I like to blabber a lot, but I only want to show you my NOTD. :-)

Wet n Wild Morbid Konad Imageplate M57 China Glaze 2030 Regular Polish Stamping

Before I painted my nails I applied Nailtek II and my base colour is Wet n Wild Morbid. I got this one in a swap some time ago and it's definitely one of my favourite greens. It's a blackened shimmery green that never bores me. It needs two coats and it applies good, the only issue I have are the caps and short brush - but that's something personal.

After that I took out my Konad Imageplate M57 and picked out the lacy leopard design. I used China Glaze 2030 as my stamping polish, I need another bottle because this one is my all time favourite. After stamping everything was sealed with China Glaze Fast Forward Top Coat.

Well, that's it for today. Take care and thanks for stopping by!
Michelle

Jaws

Tuesday, October 19, 2010
Hey everyone! Do you all remember the Jaws movies? I think you do because when I was little there was nothing more scary than that big white shark (well, Pennywise the clown was scarier, but shh). Jaws actually made me not want to go into the sea - ever. When I'm enjoying my day at the beach I'll never go further then my knees into the water. It's just really scary because I do not know what's beneath me. Now I'd like to leave my crazy personal traits here and show you my manicure. Yesterday I was watching Jaws and I thought it would be nice to make a Jaws manicure.

Jaws Nail Art Design

First I painted my nails with Misa On the Edge. I took out my sponge and sponged my nails with Zoya Robyn, leaving 1/3 from the tip as my base colour. After that I mixed Zoya Robyn with H&M Love at First Sight and sponged the tip. That is my base, the ocean.

When my base was dried I wanted to start drawing. I used a striper brush for everything unless I tell you otherwise. Here's what I used:

Pinky: Shark Attack
I sponged the pool of blood with Eyeko Saucy. After that I drew a shark fin with a striper brush and used Orly Mirror Mirror. I shaded the fin with a mix of Ciaté Vintage and H&M Love at First Sight.

Ring: Shark
This is how we know Jaws! First I created the outline of the shark using Orly Mirror Mirror. I left out space for the mouth and coloured the shark. The mouth is coloured with Diamond Cosmetics I'm Raven About You. After doing the mouth I shaded the shark using Ciaté Vintage and H&M Love at First Sight. I've also mixed these colours for a little more depth. When done shading I created the teeth with H&M Love at First Sight. Don't forget the eyes! Mine are done with the tip of the striper brush and Diamond Cosmetics I'm Raven About You.

Middle: Eek! A Shark!
The swimmer is made with a mix of Barry M Mushroom, H&M Love at First Sight and Hard Candy Splendid. His hair colour is Barry M Mushroom. Behind him is a shark fin that is made the way I made the shark fin on my pinky. I've added a little bit H&M Love at First Sight around the fin and the swimmer, it just gives a little more movement.

Index: Jaws
The Jaws logo is made with Eyeko Saucy. I've added a shark biting the logo. The colour of the gums is China Glaze Something Sweet and the teeth are made with H&M Love at First Sight. The sharks skin is a mix of Ciaté Vintage, Orly Mirror Mirror and H&M Love at First Sight.

Jaws Nail Art Design

After feeling like Bob Ross for one hour I was finally done and topped it off with China Glaze Fast Forward. I really like the shark, my dad didn't believe that I made that one so that was pretty funny. Now I want to make more stuff on my nails like this but it takes so long, I'm not that patient, darn!

Thanks for visiting and have a nice day!
Michelle

Barry M - Instant Nail Effects

Monday, October 18, 2010
Good morning all! I hope everyone had a good weekend and that the start of this new week will be very calm because we all know how sucky it is to start up after a nice weekend. My post today features a product from the British brand Barry M, a nice, animal friendly brand that offers a wide variety of cosmetics. I want to show you a product that a lot of people have been raving about on twitter and other mediums: their new Instant Nail Effects.

Barry M Instant Nail Effects Black Crackle Nail Polish

The Instant Nail Effects is a black top coat that crackles when you put it on top of another polish. This gives a crackle effect that some people love and other people hate ( - and some people just don't know how they feel about it, haha). I sure am in the first category, I think it's an awesome effect and it gives you that great little extra something. The crackle concept isn't new at all but I really wanted some crackle polish so when Barry M released this one I just had to have it.

The base colour I'm wearing didn't need any spicing up, it's Flip Flop Fantasy from China Glaze, but the contrast sure looks funky. Can't wait to try it out on other colours!

Barry M Instant Nail Effects Black Crackle Nail Polish

As you can see in my first picture Instant Nail Effects dries matte. I like it matte but I'm also afraid that it will fall off pretty quickly so I added China Glaze Fast Forward over it and it's also nice when glossy. Barry M polishes give me a good long time of wear and I'm pretty curious to see what this one does. Also, my normal Barry M polishes start to thicken up really quickly and I hope (PRAY) this one doesn't so that's also something I need to wait out and see. I'd love to see some other colours joining this one, I'm dreaming of silver sparkly crackle haha.

I bought this one at Alice & Jo's Havesentials for €5,10 (about $6,70). Instant Nail Effects can also be purchased from the official Barry M site. If you think it's a little too expensive or you're not sure if this is your taste you can also buy cheaper ones (and different colours!) on eBay.

Now, the question that is keeping me busy: do you say yay or nay?

Have a nice day!
Michelle

Nail Art Tutorial: DIY Leopard

Saturday, October 16, 2010
Hey guys! According to my question on the Eyeko Giveaway form you wanted to see more nail art tutorials, especially videos. I'm sorry if I am disappointing anyone but there will never ever be any video material of me around, I just hate camera's haha. I did find the time to do a short nail art tutorial for you all and it's an easy one: a DIY leopard. You don't need a lot for this simple manicure: two different shades of polish, a striper brush and a dotting tool or something else to create your dots with.

Nail Art Tutorial - DIY Leopard

First you're going to start applying your base colour. I really like my leopard manicure freakishly coloured so I choose Color Club Mrs. Robinson as my base colour. Mrs. Robinson is a purple neon and I love it. Must be the only neon I find myself using a lot. After applying the base colour you let it dry for a few minutes and then it's time for the next step: adding dots.

Nail Art Tutorial - DIY Leopard

There are many ways to create dots. The best thing that's ever invented for this purpose is a dotting tool: a stick with a dot on the end that will create the most perfect dots for you. These are available on eBay and at some etailers. If you don't have a dotting tool you can use a tooth pick or a bobby pin. I used Ciaté Ditch The Heels for my dots, I love the way it stands out against the neon purple.

When that is done grab the striper brush because we're going to do the outlines!

Nail Art Tutorial - DIY Leopard

This is how it will look when you're done using the striper. You just use the striper to work on the outline of the dots. Make sure you do this gentle and relaxed because you can slip up easily. If you're having troubles with these, f.e. your hand isn't steady at all then you should also pay attention at supporting your arm and wrist while working. Last but not least, sometimes you just need to practice, practice, practice. Don't worry if the spots aren't similar: leopard spots aren't exactly the same in real life! After doing the outlines I also placed a few random black dots here and there.

I used Herôme Brooklyn, a black striper but you can use every colour you like. If you don't have a striper or striper brush I suggest you get one because they are sooooo handy, I can't tell you this enough. You can also use a nail art pen if you prefer that more. Striper brushes are available on eBay (you can get nice nail art brush sets there) and some etailers will sell them too.

When that is done your DIY leopard is done and you can top it off with a top coat. I've added a CND effect for that extra glitter.

Nail Art Tutorial - DIY Leopard

The finished result, my leopard manicure with CDN Jade Sparkle on top. Hopefully this tutorial was helpful and if there's something you need to know you can always tell me in the comments. :-)

Thanks for visiting!
Michelle

Jip & Janneke

Friday, October 15, 2010
Hey everyone! From 6 to 16 October we have 'Kinderboekenweek' here in the Netherlands, roughly translated as Children's Book Week, meaning there's a whole theme week about books, specially for kids. I remember that when I was a kid I always looked forward to Kinderboekenweek (and still do!). Meeting writers, teachers who will read you a whole afternoon, sitting with the whole school in the great hall with your pillow and read your own book. Very awesome. This years theme is 'imagery in children's books' and I think we all loved pretty pictures in our childhood books. One of the books I loved and still love is Jip & Janneke, written by Annie M. G. Schmidt, full of great drawings by Fiep Westendorp. Let me introduce them:

Jip en Janneke Children's Book Nail Art Design

On my pinkie you see Takkie the dog, next to it there's Jip, then we have Siepie the cat and last there's Janneke. Maybe you've seen them already because not only is the book Jip & Janneke translated in a few foreign languages, also the Dutch company Hema has released a limited edition collection of these four figures - you might have seen the nail polish that was a part from this collection.

Jip en Janneke Children's Book Nail Art Design

See, matchy matchy isn't it? This make up bag is one thing I scored out of the cute Hema collection. Jip & Janneke is one of my happy childhood memories and I truly love Fiep's drawings and Annie's stories. If you ever stumble across this book you should definitely have a peek in it!


For this manicure I used Diamond Cosmetics I'm Raven About You as my base colour and H&M Love at First Sight for the characters. I drew them by hand with a striper brush. In the picture above I've mattified it with China Glaze Matte Magic. Also, since I've been getting questions about the treatments I use: my base is NailTek Foundation II and I use the China Glaze Fast Forward top coat.

What is your favourite Childhood book?
Michelle

CND: The Look. Fall/Winter 2010

Thursday, October 14, 2010
Good morning everybody! I was so excited when I saw these two new polishes pop up on my computer screen I decided to order these right away. This set for fall and winter contains two gorgeous polishes, Urban Oasis (colour) and Teal Sparkle (effect). Remember me raving about the two CND effects I tried earlier? I was also telling you that I really wanted to try out their normal polishes and finally, the time has come!

CND Urban Oasis  Teal Sparkle Night Factory The Look for Fall/Winter 2010

This is Urban Oasis, a teal creme. Not only am I a sucker for teal shades, I'm also a sucker for one coaters. And that's what Urban Oasis is - a one coater. The formula on this one was really good, it has a good consistency and it glides on the nail like butter. I am definitely not disappointed with the first colour I've tried from CND.

CND Urban Oasis  Teal Sparkle Night Factory The Look for Fall/Winter 2010

Here is Teal Sparkle topped over Urban Oasis. Teal Sparkle is meant to be worn over Urban Oasis for getting 'the Look'. Well, I must say that I'm liking this look very much. Teal Sparkle has fine, dense glitters that show teal, turquoise and gold on the nail and applies, like the other effects I've tried, very good. This will leave you with a smooth nail surface instead of a gritty one and that's a huge plus for me (and others who will start picking nails when the nail surface is not even).

CND Urban Oasis  Teal Sparkle Night Factory The Look for Fall/Winter 2010

My opinion on these? Get them! Urban Oasis is a pretty shade and Teal Sparkle is gorgeous plus you can use it on every polish you want. I can see myself using this one a lot! Now, excuse me because I'm going to drool over some more CND effects.

Thanks for visiting and have a nice day!
Michelle

Eyeko Giveaway

Tuesday, October 12, 2010
Hey guys! So, funny story. I ordered at Eyeko a few weeks back and today I got the order for the second time. I emailed Eyeko about it and they told me I could use these pretties for a giveaway, how nice is that! So before I continue showing you the prizes I want to thank Eyeko for their quick and kind response. I'm glad I can share these polishes with you guys! :-)

But now, on to the prizes. The first set:

Eyeko Set 1

The second set:

Eyeko Set 2

The first set contains the Cult Classics polishes as well as three new released colours. The shades: Cosmic Polish, Indigo Polish, Nude Polish, Vintage Polish, Lilac Polish, Pastel Polish, Rain Polish and Military Polish. Set #2 contains the two latest releases, Pastel Polish and Military Polish.

Everyone will have a chance of winning set #1 or #2. You can't choose the set you want, I'll let random.org decide the winners. Other things that are important about this giveaway:
- You have to be a follower (I check)
- This giveaway is open internationally
- It ends on October 31, 11:59 PM - CET.
- Fill in the form below

I've added two questions that you don't have to fill in. These are just my curiosity so if you don't want to fill these in, that's fine. :-) Make sure that if you do tweet or blog about this giveaway, you provide a link to that tweet or post. If you do not I can't count it as an entry, sorry.

This giveaway is closed!

Thanks for filling the form, a big thanks to Eyeko and good luck everyone!
Michelle

I love you, Blue

Monday, October 11, 2010
Good evening all! Today I wanted to do some stripes but as you all know I always come up with the same stripe design. The lines are always vertical. Not that I mind, not at all, but sometimes I feel so cheesy doing the same thing over and over again. That's why I decided to do something different with my beloved striped design: I got myself striped, diagonal and in my favourite colour. Now how's that for a change?! ;-)

Blue Stripes Nail Art Design

My base colour is Zoya Robyn, a polish that is in my closet for a loooong time. I finally picked it out today and wasn't disappointed! It's a very pretty bright blue creme and it applied good. I'm wearing three coats. After that I took out OPI Absolutely Alice, the famous blue and gold glitter polish, and started putting on stripes on my nails. These stripes are made freehand with a striper brush - everyone should own one! They are very handy when you want to put stripes on your nails.

Blue Stripes Nail Art Design

I topped it off with China Glaze Fast Forward Top Coat. It evened out this manicure quite good so I was happy with that, I hate it when I feel uneven bits on my nails.

Thanks for stopping by!
Michelle

China Glaze - Wagon Trail

Sunday, October 10, 2010
Hey guys! I hope you all had a good Saturday like me, the weather was great and my day was very relaxing. I picked out one of my favourite polishes to wear when it's sunny because it has a whole different look when it hits the sun: China Glaze Wagon Trail.

China Glaze Wagon Trail

I find it quite hard to describe Wagon Trail but I'll stick with a black creme stuffed with olive greenish gold shimmer. It's really FULL with this pretty shimmer which I absolutely love and it's also the reason I am particularly happy with this colour in the sun. You see, in the shade and lowlight it kind of bores me. Sometimes it looks like a black with a tiny bit of shimmer - which it absolutely isn't.

China Glaze Wagon Trail

See! Told you! When this baby hits the sun it transforms into a gorgeous blackened golden olive green shimmer that sparkles like crazy. Now that's how I like it!

Of course I had to entertain myself a little bit more today so I went for a quick Konad.

China Glaze Wagon Trail Konad Imageplate M69 China Glaze 2030 Regular Polish Stamping

I used Konad Imageplate M69 and stamped with China Glaze 2030 and the tiny flowers are nail art stickers I got from Karrie. I also found out today I really need to get myself another bottle of 2030 and Millennium for stamping because they are the ones I use the most - see this as a little note to myself.

How do you feel about Wagon Trail?
Thanks for visiting!
Michelle

Misa Meets CND

Saturday, October 9, 2010
Good morning everyone! Today I have another meeting between two pretty polishes and one of them is a CND effect. Last time I was already raving about Sapphire Sparkle and now I'm going to rave about this one, Copper Shimmer.

Misa On the Edge CND Copper Shimmer

The colour I have used as my base colour is Misa's On the Edge, a gorgeous blue creme. It's one of my favourite blues and it's opaque in two coats. On top of that I added CND's Copper Shimmer which really isn't more than - yes, you've guessed it right - a copper shimmer!

I love it. It's so glowy and shiny and pretty and oooooh wow!

Misa On the Edge CND Copper Shimmer

I guess that from now on I'll also be a CND Effects craver. I have no experience with their regular polishes but I've ordered some and I'm very excited to try them. If they are like this, well, I'm very pleased! What are you experiences with CND (Effects & Colours)?

Have a nice weekend!
Michelle
© The Lacquer Files | Disclaimer | Want to use my content? Email me first!

This work is licensed under a Creative Commons Attribution-NonCommercial-NoDerivs 3.0 Unported License.