Halloween Themed: Graveyard

Wednesday, September 29, 2010
Good afternoon all! I have a themed nail art for you today, something I really enjoy doing. Because it's almost October I thought it was fun to start off with something for Halloween.

Halloween Themed Nail Art Graveyard Design

When I think of Halloween I think of spooky and scary things so I decided to go for a graveyard. This really was an easy design, I wanted to make a tutorial but I did this in the evening so it was too dark for pictures so I might do this some other time.

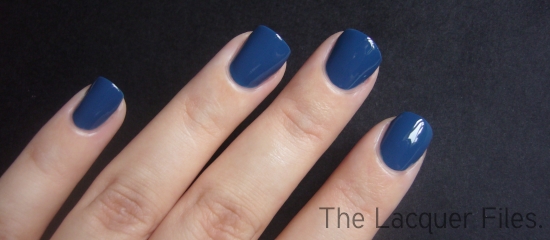
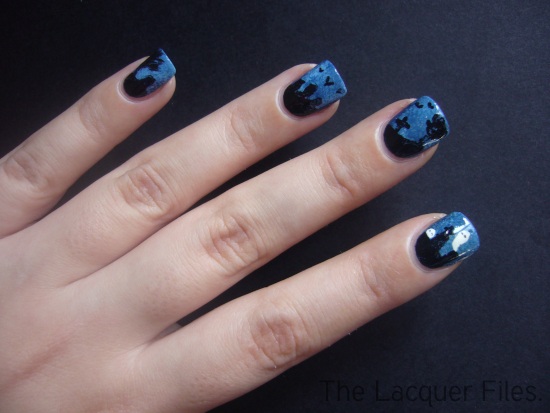
First off I started by painting my nails with Misa On the Edge, a gorgeous dark blue. I wanted it to look like night time and a little foggy so I decided to sponge a little. I used Misa On the Edge, H&M Love at First Sight and OPI DS Fantasy for this. After that I topped it with Essie Silver Bullions.

Halloween Themed Nail Art Graveyard Design

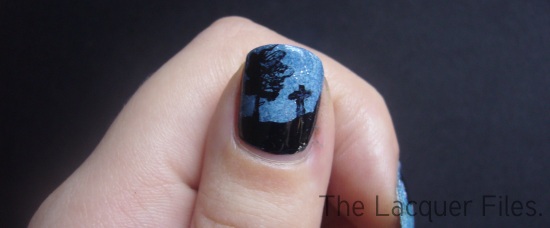
Second part of this manicure, using black and create outlines for the graveyard. I used a black striper but this is probably easier when you use a nail art pen. After creating these, you can colour them in. I didn't want it to be perfectly neat because with the black and blue a little mixed it looks like it's being lit by the moon or something, I think it's a nice little touch. The ghosts are created with a white striper.

Creating a tiny graveyard is fun, you can add pretty much everything you want. I added trees, different tombstones, crows and ghosts.

Halloween Themed Nail Art Graveyard Design

When you're done with the graveyard just top it off with a top coat and you're done!

Are you creating something special on your nails for Halloween?
Michelle

China Glaze Awakening Collection

Tuesday, September 28, 2010
China Glaze Awakening Collection Halloween 2010 Zombie Zest Ick-A-Bod-Y Mummy May I

Hey everyone! Sweet Karrie got me the China Glaze Awakening set, their collection for Halloween 2010. I'm a little late to the party but I still want to show you guys because overall I think it's a fun collection. Besides, we have one month to go before it's Halloween! :-) This Halloween, China Glaze brings us three 'ghoulish glitters' and this set also includes the China Glaze Fast Forward Top Coat. All swatches are three coats and topped off with the Fast Forward top coat.

China Glaze Awakening Collection Halloween 2010 Zombie Zest Ick-A-Bod-Y Mummy May I

Mummy May I, fuchsia glitter in a dark purple jelly base. It reminded me of Wet n Wild Night Prowl but that base is black. Mummy May I's base looks black but it really is a little softer. It's not unique but it's definitely fun to have!

China Glaze Awakening Collection Halloween 2010 Zombie Zest Ick-A-Bod-Y Mummy May I

I immediately knew I would love Zombie Zest. It's a swampy green jelly with gold, blue and green glitter. The glitter is very fine and dense, creating a great effect when you're wearing this pretty. This is a dupe for one of my favourite polishes of all time, SpaRitual Optical Illusion, and Orly It's Not Rocket Science.

China Glaze Awakening Collection Halloween 2010 Zombie Zest Ick-A-Bod-Y Mummy May I

This is Ick-A-Bod-Y, a dark green jelly packed with loads of orange glitter. I was really excited for this shade because of the combination - green base with orange glitter - and even though my expectations weren't reached, I'm definitely not disappointed! You can see the green base peeking through the glitters - awesome! - but I'd love to see a little more base. I'm too picky, sorry.

Application wasn't great, the polishes were a little droopy and Ick-A-Bod-Y was too thick for my taste. It isn't unmanageable but you want to be in a 'zen' mode when applying. Zombie Zest is the only one with finer glitter, for the other ones I'd really use a thicker top coat. Speaking of top coat, I am very satisfied with the Fast Forward. It gives me a smooth finish and dries fast, very nice!

Do you own these and how do you feel about them?
Michelle

Milani - Hi-Tech

Monday, September 27, 2010
Hi guys! Today is the start of a new week and it's a strange start for me. It's not only my birthday, I'm also visiting the cremation today and it really gives me a double feel. It's le strange! However, being strange and all, I'm glad I'm a part of it and happy that I got to say goodbye my way yesterday. Like I said in yesterday's blogpost; being positive, even in shit times, helps a lot. Keep that as your mantra! ;-) Now let's go to the polish I am falling deeply and madly in love with.

Milani Hi-Tech

This is Milani Hi-Tech, also a polish my parents gave to me for my birthday. I'm really liking this one, it's a bright green holo with a strong yellow tone in it. I've never seen a green holo like this and that's why I'm loving it! The holo effect is scattered and it doesn't translate that good in my pictures but it's definitely there.

Application was good, I applied this one over Nailtek Foundation II and I had no issues at all with polish dragging or bald spots. I'm wearing three coats of Hi-Tech, no top coat.

Milani Hi-Tech

This one is available at the Dutch web shop Boozyshop. The owner of the shop is really friendly and ships internationally so if you want to order something, don't hesitate to contact her! The whole Milani 3D line is available there for €5,95 and I'll be buying some more because this one hasn't disappointed me at all.

How do you feel about the Milani holo's?
Michelle

Misa - When U Say My Name

Sunday, September 26, 2010
Hey everyone! As promised a swatch from a polish I received two days ago as an early birthday present. :-) I wanted some polishes for my birthday so my parents told me to pick out what I wanted, awesome! I really wanted some polishes from Misa's new collection, What I Like About You, so it's not strange I chose some of them. First up, When U Say My Name!

Misa When U Say My Name What I Like About You Collection 2010

When U Say My Name is a gorgeous brown with copper shimmer. It gives the polish so much warmth! I don't wear browns a lot and most of them I really dislike but this is definitely one that is amazing and everyone should have. I ordered this because I thought it looked great with gold Konad but it's just as pretty on its own.

Misa When U Say My Name What I like About You Collection 2010

Seems I was right, I think it looks absolutely gorgeous with gold! I've used China Glaze 2030 and Konad Imageplate M71.

I'd also like to tell you about a more serious issue. I have been in a shit situation the past week due to a death of a really great and inspiring person and it was really unexpected. Because of that I didn't had the chance of speaking with him before he died and that is something I really regret. Unfortunately I can't change that but I can change my regret into something different. I can say to myself that he knows that I admire him and that I care about him. The thing I want to say with this is that when something bad happens you can change that by your way of thinking. Try to make the negative positive and even though that's something very hard to do, you will feel better.

From real life to virtual life it's the same. Things that happen on the internet are most of the time not that important and shouldn't be seen as really life changing but when something does affect you talk to that person. Don't treat each other like crap and let someone be. Be smart, funny and positive. Don't do things you might regret later.

Take care!
Michelle

Sally Hansen - Hidden Treasure

Saturday, September 25, 2010
Hi all! It's Saturday, time to relax and enjoy the first day of the weekend. Yesterday I received my first (early) birthday present from my parents, they gave me a bunch of new polishes and I'm hoping I can show you one tomorrow because I know I can't resist playing with them today!

For today I want to show you a polish that I own for a little while and got it in a swap. I was very happy when this one arrived because it really was a 'hidden treasure' for some of us!

Sally Hansen Hidden Treasure

This is Hidden Treasure over Diamond Cosmetics I'm Raven About You. I used two coats of Hidden Treasure because I wanted this to look really in your face and I think that is a succes! ;-) Hidden Treasure is a clear base with orange, gold and green duochrome flakies. Application is okay, I really don't know how to feel about the brush because it's big and wide. Working with it isn't hard but it looks so... strange? Probably some kind of pet peeve.

I love it, the colours give me a really great autumn feel. It's great how the flakies shift colours! I've also mattified it and this is how it looks:

Sally Hansen Hidden Treasure Matte

Pretty neat eh! Looks a bit like burning coals and even better, the duochrome effect isn't gone! Hidden Treasure is very pretty and if you can't find this one, there are plenty of other polishes that are dupes or really darn close, f.e. Gosh Rainbow, Nubar 2010 and Kinetics Daisies and Paislies.

How do you feel about these kind of flakies? Like or not?
Michelle

Urban Decay - Bruise

Friday, September 24, 2010
Hey everyone! Seasons change, fall has kicked in and even though I always love to wear dark colours, it's really noticeable I'm picking out the darkest colours from my stash to wear.

Urban Decay Bruise

This is Bruise by Urban Decay, one of the polishes I love to wear this period. It's a dark eggplant with green shimmer - giving this polish an awesome blueish duochrome effect.

It applies good and the brush is easy to work with but to be completely honest, this polish is so pretty I'd wear it even if it would apply like crap. I'm wearing three coats in the picture, without top coat. I bought this one on eBay for €6 - shipping costs included - so you can imagine how happy I was finding it. There are more Bruises on eBay looking for a home so don't hesitate when you stumble upon one, it's definitely a fantastic addition to your stash. There's only one thing I need to do now... Going on a hunt for more old Urban Decay polishes!

How do you feel about Bruise and other old Urban Decay polishes?
Michelle

Nfu.Oh #51

Thursday, September 23, 2010
Morning guys! Today I want to show you a polish that is widely praised, Nfu.Oh #51.

Nfu.Oh #51

Nfu.Oh #51 is a purple based polish filled with pretty flakies. This polish has many faces: the flakies change from red to green to blue to gold and so on. You can see a little bit of this action in the bottle - and a teeny tiny bit on my nails.

On it's own #51 is a brighter purple. I like it but I think it looks better when layered over a darker polish. I've layered #51 over Collistar Viola Glitter, awesome combination! I used two coats of Viola Glitter and one coat of #51 (wish I did two, the pictures are a little mwehhh when it comes to the gorgeousness of the polish).

Nfu.Oh #51

Now, the fun part. My birthday is coming up and I love Nfu.Oh as a brand so I want to share some of the fun with you guys! :-) I'm giving away one brand new bottle of Nfu.Oh #51. If you want to win this, here are the rules:
- You have to be a follower of my blog (I check)
- Fill in the form below!

This giveaway is closed!

Good luck everyone and thanks for visiting! :-)
Michelle

Glitter Puke

Wednesday, September 22, 2010
Hey everyone! I really like glitter polish but sometimes I don't want to wear a full mani with glitters so I always try to find something for it. Sometimes I do a glitter french or a moon manicure but last time I tried something different.

Diamond Cosmetics I'm Raven About You China Glaze Spellbound Misa Confection Section Essie Silver Bullions Glitter Manicure Nail Design

It's like someone puked glitters over my nails!

I like it when glitters pop out and have a contrasting colour underneath so when I was picking out colours I decided to go for a black background and silver glitter. The black I used is Diamond Cosmetics I'm Raven About You, one of my favourite blacks because it's not watery, it's opaque and even in two coats.

Diamond Cosmetics I'm Raven About You China Glaze Spellbound Misa Confection Section Essie Silver Bullions Glitter Manicure Nail Design

After applying the base colour I used the Essence Silver striper and started to create stripes from the tip of my nail towards the cuticle. All these stripes variate in length. When that was done I used Essie Silver Bullions and applied this pretty over all the stripes. You can use a striper for this but Silver Bullions is not that dense so I used the brush.

When done with that the next glitter that I applied was from China Glaze, Spellbound. I love this one and the orange glitters that are in it make this polish for me a special one. And last, but certainly not least, all this was topped with Misa Confection Section. There you have it, glitter puke.

Diamond Cosmetics I'm Raven About You China Glaze Spellbound Misa Confection Section Essie Silver Bullions Glitter Manicure Nail Design

I expected this to be all bumpy but that wasn't the case after I topped it with China Glaze Fast Forward top coat. Nice! This is a manicure I'm looking forward creating in different colours, I absolutely love it!

Thanks for stopping by! :-)
Michelle

U.M.A. - Arctic Blue

Tuesday, September 21, 2010
U.M.A. Arctic Blue United Makeup Artists Nail Polish

Morning guys! When this post goes up I'll be working for the first day in a long while and I hope I enjoy haha.

U.M.A. stands for United Makeup Artists and is a brand we stumbled upon during one of our German shopping trips. We've never heard of the brand but looking at the bottles (cute!) we decided to buy a few. Unfortunately I can't remember the price but I believe it was pretty fair, otherwise I'd never buy a mini size polish. I think it has the same size as the OPI mini's, which is 3.75ml but U.M.A. doesn't have it listed so I'm really not sure. U.M.A. polishes are B3F, huge plus for me! I never understand why companies still use those crap chemicals because in my mind it isn't necessary to use them at all.

U.M.A. United Makeup Artists Arctic Blue layered over China Glaze Secret Peri-Wink-Le

I've layered Arctic Blue over China Glaze Secret Peri-Wink-Le. Arctic Blue is very sheer and I didn't see why I should try to build it so I didn't. I already used three coats over Secret Peri-Wink-Le, so go figure haha.

Arctic Blue is, despite being super sheer, quite pretty. It has a sheer lavender base that is stuffed with greenish and blueish golden glitters, giving this polish a gorgeous depth in the bottle. On the nails it translates to gold glitters and giving Secret Peri-Wink-Le a lavender sheen. It's pretty but dang, I want this polish to be opaque!

For more information about U.M.A. you can check out their website. They also offer nail art pens, stamping kits and nail art supplies such as beads and stickers, very fun. I do remember though I found these nail art stuff a little too expensive, I can't remember prices though. I believe this brand is only available in Germany but if that isn't so, please let me know!

Thanks for visiting and enjoy your Tuesday!
Michelle

WAH!

Monday, September 20, 2010
Hey all! I hope everyone had a good weekend and that you'll have a good day this Monday. We all know that the start of the week can be a little tough sometimes! :-) Today I want to show you a manicure that I absolutely love and is inspired by WAH Nails. WAH Nails is a British nail salon and they come with awesome new designs every time!

Wah Nails Inspired Cartoon Nail Art Design

This is the one I tried, the 'POW!' manicure. I love these cartoon like designs in all their versions.

What's even better is that these designs aren't that difficult to recreate but you got to have some patience. First I painted my nails white using H&M's Love at First Sight, the most fantastic white creme ever(!) except my pinky, that one was painted with OPI's OPI Red. After that I used OPI Red on my middle and thumb nail to create a white pointed area (hmm, you know what I mean) where the text would come in later. I used the OPI brush and held it sidewards - this gives you a smaller stripe.

When that is done I took out the Essence Nail Art Pen in Solid Black and accentuated the pointed areas. After that I wrote the words 'WAH' and 'BOOM' in them. And then the fun part starts: dotting! I used a dotting tool with a very small tip because I wanted my dots small. I used the same colours for the dots as my base colours.

Wah Nails Inspired Cartoon Nail Art Design

Here's my thumb. I didn't wait long enough for the polish to be dry so the Essence pen dragged a bit nail polish - told you this manicure wasn't for the impatient types. ;-)

I topped this off with INM Out the Door top coat, I'm testing that one right now. To me, red is like THE stain and smudge colour so I waited 30 minutes before I applied the top coat. I applied the top coat in a floating way because I was still scared of smudges but it didn't help, it still smudged. Was it me, was it the top coat or the awful red? I don't know but this got me bummed!

Wah Nails Inspired Cartoon Nail Art Design

If you're interested in seeing more WAH designs you definitely should check out their site, they use Tumblr and they update it every day with lots of awesomeness. You can see the goods here!

What's your take on their designs? Do you use them for inspiration?
Take care!
Michelle

Mrs. Robinson meets Sapphire Sparkle

Sunday, September 19, 2010
Good morning everyone! How is your weekend so far? I went to an aerobatics show yesterday and it was very fun, I really want to do that myself again. Other than that I'm relaxing a LOT, I hope you will do too today - it's Sunday so it's okay to be lazy.

When we were on our vacation in August sweet Natasja dropped by and she brought a few polishes including CND Sapphire Sparkle. We were all amazed how pretty it looked and I ordered it myself.

Color Club Mrs. Robinson Poptasic Collection CND Effects Sapphire Sparkle

Mrs. Robinson is from the Color Club Poptastic collection and it sure 'pops'! It's a super bright magenta creme. I needed two coats for it to be opaque but I added a third one because you could see my nail line in the pictures (macro is still a bitch).

I topped Mrs. Robinson with CND Sapphire Sparkle. Sapphire Sparkle is from their Colour & Effects line. The line exists out of 50 colours and 15 effects which is really awesome because you can keep combining with these pretties. Sapphire Sparkle is a glittery clear based polish that also is duochrome. It changes blue and purple and it's awesome. I had issues with photographing the purple but I'll definitely show you a bit more of CND layering so I'll try next time! :-)

Color Club Mrs. Robinson Poptasic Collection CND Effects Sapphire Sparkle

Enjoy the last day of the weekend and thanks for visiting!
Michelle

Pastel Leopard

Saturday, September 18, 2010
Hi everyone! Finally, weekend! :-) I've showed you a nail art design a while back, the crazy leopard one and yesterday I wanted to do a similar thing but a little less in your face.

Pastel Leopard Nail Design Nail Art Konad Imageplate M57 Regular Polish Stamping

I chose pastel colours for this design. The base colour is Something Sweet from China Glaze, a very pale soft pink. After applying my quick dry top coat (I'm super impatient) I used Konad imageplate M57 and China Glaze 2030 for the leopard print. I wanted to use a pastel for this but 2030 is one of my favourite stamping polishes, it stared at me and I couldn't refuse. When that was done I coloured the spots with Diamond Cosmetics Tranquility, using a small and thin paint brush.

Pastel Leopard Nail Design Nail Art Konad Imageplate M57 Regular Polish Stamping

I mattified it to see how it looked but it didn't make a huge difference as you can see on my picture. I think it looks pretty cute for a day and I'm sure it will be removed tomorrow. Hopefully I can find some inspiration to do freehand nail art because I'm really missing my mojo haha.

Have a nice weekend!
Michelle

Nfu.Oh #66

Friday, September 17, 2010
Hey all! Exciting news, I finally have a new laptop and a new job! Today I want to show you another Nfu. Oh holo, this time it's a light green one. It's very pretty and the green is so subtle it almost appears silver in my pictures but really, it's a GREEN. ;-)

Nfu.Oh #66 Green Holographic Nail Polish

This is Nfu.Oh #66 in the full sun. It's fantastic and it might not look as holographic as the first Nfu.Oh holo I posted, it really is! In real life it's a little more intense than the picture is showing, it's awesome!

Nfu.Oh #66 Green Holographic Nail Polish

In the shade, #66 looks more silver than green but that is not bad, the green is still noticeable. I'm wearing one coat of Nfu.Oh Aqua Base and two coats of #66. The special base really helps with the coverage, without the Aqua Base I needed four coats.

Nfu.Oh #66

BAM! See, it's still very holo. My photo taking skills weren't that good yesterday. :-)

What is your favourite brand when it comes to holographic polishes?
Thanks for stopping by!
Michelle

FingerPaints - Easel-y Entertained

Thursday, September 16, 2010
Hey guys! Yesterday I showed you Borghese Stellar Notte, a polish that I got from dear Karrie, and today I'm also showing you a polish she gave me! After I finished up the post about Stellar Notte, the mailman arrived and gave me a the second swap box, full of goodies! The ones that follow me on twitter have seen what's in it and for the ones who haven't seen it, it will be a surprise. I'm really happy with every single item that was in the box and I'll be showing you lots of new things. :-)

FingerPaints Easel-y Entertained

This is Easel-y Entertained from FingerPaints, a brand I've never tried before. The bottle looks really good to me, very simple (I like it when things are simple). Easel-y Entertained is a blue (plus a teeny tiny hint of purple - not 'blurple' though) glitter in a clear base but that's not all... No! It also contains silver glitter, not as much as the blue glitter, but it's definitely noticable.

FingerPaints Easel-y Entertained

This is Easel-y Entertained in the sun and it isn't that noticable in my picture, it really sparkles! It's absolutely gorgeous. Application was okay, even though it has a clear base it's easily buildable to get an opaque result. I needed three coats and I'm also wearing a top coat because it dries a little bit matte. It dried a little slow but nothing a quick dry top coat can't help!

I am very happy with this one, it reminds me of the night sky in summer. Definitely a shade I'll be wearing a lot, so once again: thanks Karrie! You absolutely know what I like (and you're spoiling me)! :-)

Have a great day everyone and take care!
Michelle

Borghese - Stellar Notte

Wednesday, September 15, 2010
Hey everyone! Today I want to show you a polish I really really wanted for a long time and finally received it a while back in the great swap I did with Karrie from Beautopia.

Borghese Stellar Notte

Oeeeeeeh! Pretty! Stellar Notte has a dark grey base and is packed with loads of different shimmer: purple, pink and green. It's so awesome! It gives you dark green shimmery nails with a purple flash, sometimes with a little pink shimmer peeping through.

I needed three coats for this one to get opaque and it wasn't without a struggle! The brush is wide and flat, not like an OPI brush, it was flat and wide in a suckier way. I like OPI brushes but this one didn't work for me. The brush is rough too so I needed to be very zen before applying this one - otherwise I'd make a huge mess.

Borghese Stellar Notte

It stayed on for two days. Now I don't mind that because I change my nail colour a lot but I can imagine this would disappoint people. Besides all this, I think it's too gorgeous not to use. I absolutely adore the colour and Karrie rocks for sending me this one, so sweet!

Thank you all for visiting! :-)
Michelle

Nfu.Oh #64

Tuesday, September 14, 2010
Hi guys! I hope you are all doing well. On vacation I got my two Nfu.Oh holographic polishes and I got addicted instantly so I started buying more. I have two left to buy and then I have the collection complete, collecting every single holo polish from Nfu.Oh is worth it and they look absolutely stunning. Today I'm showing you #64, a pink in-your-face holo. I think Nfu.Oh holo's are the most holographic of all polishes around (at least the ones I've seen) and no I'm not telling a lie, check for yourself:

Nfu.Oh #64 Holographic Nail Polish

How awesome is that?! I am madly in love with this pretty. However, I do feel the Nfu.Oh holo's are the kind of polishes you either love or hate. There isn't something in between really - they are just screaming holo and that isn't everyone's taste.

I applied two coats of Nfu.Oh #64 over Nfu.Oh's Aqua Base. The Aqua Base makes it much more easier to apply holo's: no more bald patches and polish dragging, woohoo! You can also look for the Gosh Fix Base Coat that has the same qualities as the Aqua Base but contains less ml and is therefore more expensive (€9.10 for 18ml of Aqua Base and €6.95 for 7ml of Fix Base Coat). Wearing one of these base coats don't affect the holo though - but who needs to have more holo than this?!

Nfu.Oh #64 Holographic Nail Polish

I took this picture while the sun was behind the clouds so there's no need for direct sunlight if you want to see this pretty. The holo changes all the time, depending on the way you hold your hand and the light (source).

Top coat is a strange story. I find holo's to wear off pretty quickly and to prevent it you can wear top coat but this does dull the effect of the holo. It's your pick, I chose not to.

Nfu.Oh #64 Holographic Nail Polish

This is Nfu.Oh #64 in the shade. It's toned down a whole lot but you can still see the holo a little. I'd rather sit in the sun the whole day than looking at this colour but because of the awesome finish I'll stand to look at this sometimes. Me and pink, not a good combination unless there's something fab about the polish.

I've bought my Nfu.Oh polishes on NailXL but they are also available on Viis and Fabuloustreet.

How do you feel about the Nfu.Oh holo's?
Thanks for stopping by and take care!
Michelle

How to look good naked

Monday, September 13, 2010
Hey everyone! A while ago 'Mannequin Hands' were a little hype - if you don't know what I'm talking about: it means that you pick out a nude polish that matches your skintone. I don't like nude polishes very much but I do own one that matches my skintone a little.

OPI Sand in my Suit Colour Club Revvvolution Lace Design Konad Imageplate M71

It's OPI Sand in my Suit. I must have bought it while I was half asleep or bored because I really really don't like it. Sand in my Suit is from OPI's South Beach Collection (Spring/Summer 2009) and it's a shimmery nude. It looks good on others, I just don't like the way it looks on me. Makes me feel naked.

There is one thing I do like about these nude colours: stamping.

OPI Sand in my Suit Colour Club Revvvolution Lace Design Konad Imageplate M71

Here is Sand in my Suit stamped with Color Club Revvvolution and Konad imageplate M71. There are no special thoughts about this design, I just love the lace pattern and because I don't use this one enough I picked it. The pictures are made in the shade so the holo effect is a bit lost, but it looks really nice in the sun. Sparkly. :-)

OPI Sand in my Suit Colour Club Revvvolution Lace Design Konad Imageplate M71

What is your take on nude polishes like this one? Do you wear them a lot or completely avoid them?

Thanks for stopping by!
Michelle

Incoco: a Perfect Manicure in Minutes

Sunday, September 12, 2010
Hi guys! Today I want to show you something I only have heard of since a couple of months: nail polish strips. Incoco is a brand that offers these self-stick nail polish strips.

Incoco Nail Polish B3F Strips

The Strips

Incoco offers you strips that are made 100% of nail polish. There is a big variation in the strips you can find: color manicures, glitter manicures, french manicures, pedicures, tips and sheer. You don't have to worry about staining because each strip contains base coat, nail polish and a top coat. The strips are B3F, which means they don't contain formaldehyde, toluene and DBP. Depending your lifestyle, the strips can be worn about fourteen days.

Incoco Nail Polish B3F Strips

How to Apply

You might think it's hard to apply but after doing it a few times you know the drill. First you select the size and make sure you start with neat nails: you clean, buff, shine the nails and push back the cuticles. After that you peel of the clear film and the colour strip. You take off the tab from the strip and you apply it to your nails. Rub the strip on your nail and smooth out the wrinkles. You push the end of the strip under your nail and tear off the excess. If it's necessary you can smoothen up the edges with the included file.

There, you're done! If you are a picture person yourself I suggest you take a look on Incoco's site. It shows you how to do it in film, pictures ánd a PDF file.

Incoco Nail Polish B3F Strips

My Experiences

Incoco was very generous and gave me quite a lot to play with. I have tried most of them and they stay on for a long time! I get bored easily but the longest I've had one set on was 6 days and it still looked great. Application is a bit difficult at first but you'll get the hang of it quickly enough. Removing these is also very easy, even glitter removal is okay and no longer a pain in the ass. :o) I'm wearing Berry Rich in the picture, a very warm and sparkly purple shade.

For more information you can check out the Incoco website. For us Dutchies there is good news, these strips are being sold under the name Impulss and can be found in Douglas and ICI Paris XL. Prices variate but the Berry Rich sells for $7.99. You'll receive two strips and that is one full manicure.

The product in this post is provided by the manufacturer or their PR company for consideration.
For more information please read my disclaimer.

Contrast Marble

Saturday, September 11, 2010
Hey everyone! Lately I've been really lacking inspiration for nail art and I'm also into contrasts soooo I did a watermarble just to give you a little bit of artsyfartsy stuff.

Contrast Water Marble OPI Damone Roberts 1968 Eyeko Punk Polish

I prepped my nails with OPI Damone Roberts 1968 - also used for the marbling as well as Eyeko Punk Polish. I really like the way these bright and soft colours mix.

Again no pattern! I am such a neat freak that I really dislike it when patterns aren't the same so I always marble quite random. Silly silly silly, I know but I also know I'm not the only one haha!

What is your favourite contrasting colour combo?
Michelle

Essence - Denim Wanted Collection

Friday, September 10, 2010
Essence Denim Wanted Limited Edition Fall 2010

Hi guys! Yesterday I showed you the new Catrice collection and today it's time for the new Essence collection, Denim Wanted. Denim Wanted is also limited edition and, like the name tells you, inspired on denim. It's an original theme so let's have a look to see how they've translated denim into polish!

Essence Denim Wanted Limited Edition Fall 2010 High Waist Pink

Meet High Waist Pink, a pink creme that struggles to become a coral! It's bright and bold. I'm wearing three coats.

Essence Denim Wanted Limited Edition Fall 2010 I Love My Jeans

I Love My Jeans is the odd one out: it isn't a creme, it's a black shimmer. At first the shimmer looked silver but it's actually light green and pink shimmer. I'm wearing two coats.

Essence Denim Wanted Limited Edition Fall 2010 My Boyfriend's Jeans

My Boyfriend's Jeans is a dark blue creme. It looks a little dusty. I'm wearing two coats.

Essence Denim Wanted Limited Edition Fall 2010 Fivepocket Grey

Fivepocket Grey is a medium grey creme. Again, I'm wearing two coats.

I miss one - 04 Forever Mine - but when I'm able to find it I'll swatch it and update this post. I hope I will find it though because I haven't seen anything that looked like it even excisted haha.

Overall the collection has nice shades but nothing spectaculair and I don't think the theme is that well noticable. The cremes don't apply the way I'd like them to, they're a little too thick and flood easily. The shimmer on the other hand applies very good. These were all two coaters, except for High Waist Pink and you don't necessarily need top coat. They dry very glossy.

The Essence Denim Collection is available for €1,79. I've bought mine in a Dutch drugstore but I believe that Essence releases this collection through most of Europe. By the way, when you're checking out the polishes make sure you grab the gelliners as well, they're nice!

How do you feel about this collection?
Michelle
© The Lacquer Files | Disclaimer | Want to use my content? Email me first!

This work is licensed under a Creative Commons Attribution-NonCommercial-NoDerivs 3.0 Unported License.