Showing posts with label Nail Art. Show all posts

Silver Snow

Friday, December 3, 2010
Hey everyone! So this past week the temperature has been dropping like crazy and it even started to snow, what to me is quite unlikely this time of year. November is just over and it already is like Winter Wonderland out there! Not that I complain - I love a white world!

For todays manicure I decided to use the snow as my inspiration but to be honest, it isn't much of a manicure. I've slapped some polish on a sponge and that's it.

Silver Snow

Ha, metallic snow! My base colour is CND Asphalt, a dark grey creme. I know I've said this a whole lot before but I love how the CND polishes apply, they're all so smooth! After that I took out a normal household / kitchen sponge (in the Netherlands we have these ugly yellow one) and used Orly Shine for sponging. Orly Shine is my favourite silver, it's not dense looking but more scattered.. Makes it perfect for my metallic snow. The household sponges work good for sponging like this and best thing: they're el cheapo! I cut them into small pieces so it's easier to work with and you don't make a mess of all your fingers. Make up sponges also work good and don't have to be that expensive.

While typing this post I was thinking how cool it would be to have metallic coloured snow. You know, silver, gold, bronze... Woahhh. It would be so pretty!

Take care dear readers, thanks for visiting!
Michelle

Want to play a game?

Saturday, November 20, 2010
Hey everyone! I hope you all had a good start of the weekend. I cleaned my room from top to bottom and I realized I really need to find another way to store my polishes. I don't want a second Helmer because I have issues with round bottles (yeah.. kind of OCD-ish) so I was thinking of shelves. I'm going to pick some up in an hour or so and hopefully it works out. I might post the results later!

You might have noticed that I'm posting less these past weeks and that's because I've worked a lot. I really like working but sometimes I really crave for 'me-time' and finally, yesterday I had. I decided to create some nail art that I haven't done in quite a while, freehand with my striper brush.

Saw

Of course you see right away what my inspiration was! - If not, you've been living under a rock. ;-) I'm not really a Saw fan, I liked the first film but after the second I felt it became boring. I don't know which one is or will be in theatres now, probably part 34, but this one is inspired on the first film.

I've used a striper brush for all the designs and the base colour is H&M Love at First Sight.

Saw

Pinky: Jigsaw puzzle
The outline is done with Diamond Cosmetics I'm Raven About You and I've coloured the centre piece of the puzzle with Orly Poison Apple.

Ring: Spiral
The spiral is inspired by the cheeks from the puppet. I've started from the centre of the nail, using Orly Poison Apple, and swirled around the point I started the spiral.

Middle: The Puppet
First I created the outline with Diamond Cosmetics I'm Raven About You, as well as his hair, nose and eyes. I did some shading with Orly Mirror Mirror and coloured the eyes, lips and cheeks with Orly Poison Apple. Last thing is to create the pupils with the Diamond Cosmetics.

Ring: Saw
I used China Glaze Millennium for the saw. I just made a thick stripe on my nail and added the saw teeth. After that I used Orly Poison Apple to tip the saw teeth and the small puddle of blood.

Voila, topped it off with China Glaze Fast Forward and done. I haven't done my thumb because this was a little experiment and I must say, this design was pretty easy to create. Especially the saw and spiral are easy to make though you need a steady hand. Made a mistake? You can always do a little touch up when you've finished the design.

Have a great weekend and take care!
Michelle

Flower Power!

Saturday, November 6, 2010
Good morning to all! I hope everyone's doing fine. A while back I posted a flower manicure, actually I posted a few, but this one was made with the stickers I got from Karrie and now I have another sticker version for you. I don't know why but I'm really into flowers lately and because I haven't got a lot of time nail art stickers are my new best friends.

Flower Nail Art Stickers Sparkly Nails Striper Brush

First I painted my nails with Color Club Who Are You Wearing. Once that was dry I started to apply stripes with my striper brush and two Ciaté Polishes: Main Stage and Talent Scout. I only used Talent Scout for two stripes, giving it kind of a twist. The stickers are provided to me by Sparkly Nails.

Sparkly Nails is a British web shop that offers a lot of nail art products. These stickers I got look really nice but there's one thing to remember when applying these: they are thin. That means they fold over easy and with easy I mean EASY. I ruined three flowers before I finally thought of picking my gemstone stick, so I could apply the stickers with that. Ha, success! If you don't have a stick like that you can also use a toothpick but remember, even when you're using this you still have to be very gentle with them.

Flower Nail Art Stickers Sparkly Nails Striper Brush

I'm a sucker for these cute sticker sheets, I never come across these in stores. They seem to have a better quality than the ones I normally get, even though they're harder to apply. I haven't topped these with a top coat and they stayed on for two days. You might think that's not long but I've worked with them (cleaning job) so actually I was pretty surprised, they did survived while my hands were in the water for two days. Right now these stickers are available for £1.80 per sheet, or £4.50 for three sheets. Sparkly Nails ships worldwide.

Have a nice weekend and take care!
Michelle

The products in this post are provided for consideration.
For more information please read my disclaimer.

Fimo Flowers

Tuesday, October 26, 2010
Hey everyone! I've been wanting to buy fimo canes for nail art purposes but never did because I thought slicing these up would be kind of an impossible task for a clumsy person like myself. Luckily for me, and everyone else that doesn't trust themselves with a razor blade, there are plenty of shops around selling pre sliced fimo pieces. One of the shops that does so and where I placed an order not too long ago is Mardy MakeUpShop, a Dutch web shop. The fimo slices variate in prices but these flowers were €1.25 for a bag of about 100 pieces. Not bad ey! I also want to say that they were fast with my order, I received it the next day. Like they personally stuffed it in my mailbox!

Fimo Flowers Nail Art Design Fimo Cane Slices

I first applied a base colour, I picked Color Club Who Are You Wearing? from Color Club's Rebel Debutante collection. It's really nice, wearable whitish creme that's leaning towards a very light type of lavender. It's very subtle and I picked it because I thought the flowers would really jump out with a base colour like this. After that I placed some random vine-like stripes and added the flowers - sticking them to my nails with a little bit of top coat.

Ados Striper

The striper was sent to me by Mardy MakeUpShop for a review and I was excited to try this one because I've never tried something from Ados. I've actually never heard of the brand before, don't know if I have been living under a rock but from first sight it looked good. I got number 27, it's a somewhat murky kind of green glitter in a transparent base. The brush is long and thin, just a normal striper brush, and the cap is long and pointed which makes it very easy to handle. The glitters are pretty dense so it doesn't leave you with spaces that don't have any glitter, I like that.

It costs €2.50 and it contains 5ml of polish. Now I know there are a lot of stripers available on eBay that can be bought for less and that's also a great buy but I have to say that I like the Ados striper more. Some of my eBay stripers smell really bad (like paint thinner?!) and the design isn't as nice. Also this one is B3F and I'm not sure if the eBay stripers are. I would buy more of these if I needed more stripers but to tell you the truth I can't stash some more in my Helmer - I got too much.

Fimo Flowers Nail Art Design Fimo Cane Slices

I'm very much in love with the fimo slices I got, they are adorable and I have ordered a lot more of these pretties. I just saw they also had Christmas themed fimo slices and I'm such a sucker for those kind of themed things so guess what you'll be seeing soon..?

Mardy MakeUpShop ships internationally. I'm very happy with a web shop like this because they offer nail art products for small prices and they also carry a lot more products so be sure to check it out.

What's your thought of fimo? Like it or not? And do you trust yourself with a razor blade?

The product in this post is provided for consideration.
For more information please read my disclaimer.

Blue Leopard

Monday, October 25, 2010
Good morning people! How was everyone's weekend? I've used my weekend to regain some energy after the busy day on Friday but I'm totally feeling good and happy to start with this new week. Strange isn't it, especially since it's Monday and normally I think that is the most terrible day of the week. Now I can't be bothered! Hope you all have the same good mood like I have! :-)

Today I want to show you all something I made a couple of weeks ago.

Blue Leopard Nail Art Design

It's a strange blue leopard design! I've seen a couple of these designs being posted on the interwebs and I think they look pretty darn cool so I decided to make one myself.

First I applied Misa Quirky Smile (pretty blue, you should get it) and applied H&M Love at First Sight on top of that (and the other way around for my pinky). After that I created the leopard spots like I showed you in my DIY Leopard Tutorial. I used the black Herôme striper and Zoya Robyn as my colours and then I used the silver Essence striper to create some silver lining. Last, it's sealed with a top coat.

This design is pretty easy to make, you just want to make sure you apply the polish in a right order (this causes less frustration) and if there's polish flooding your cuticle you can easily remove this with a small brush. If you can't create straight lines by hand you can also use tip guides - sometimes you find some with a nice shape but you can also cut some yourself - or painters tape.

Thanks for visiting!
Michelle

Jaws

Tuesday, October 19, 2010
Hey everyone! Do you all remember the Jaws movies? I think you do because when I was little there was nothing more scary than that big white shark (well, Pennywise the clown was scarier, but shh). Jaws actually made me not want to go into the sea - ever. When I'm enjoying my day at the beach I'll never go further then my knees into the water. It's just really scary because I do not know what's beneath me. Now I'd like to leave my crazy personal traits here and show you my manicure. Yesterday I was watching Jaws and I thought it would be nice to make a Jaws manicure.

Jaws Nail Art Design

First I painted my nails with Misa On the Edge. I took out my sponge and sponged my nails with Zoya Robyn, leaving 1/3 from the tip as my base colour. After that I mixed Zoya Robyn with H&M Love at First Sight and sponged the tip. That is my base, the ocean.

When my base was dried I wanted to start drawing. I used a striper brush for everything unless I tell you otherwise. Here's what I used:

Pinky: Shark Attack
I sponged the pool of blood with Eyeko Saucy. After that I drew a shark fin with a striper brush and used Orly Mirror Mirror. I shaded the fin with a mix of Ciaté Vintage and H&M Love at First Sight.

Ring: Shark
This is how we know Jaws! First I created the outline of the shark using Orly Mirror Mirror. I left out space for the mouth and coloured the shark. The mouth is coloured with Diamond Cosmetics I'm Raven About You. After doing the mouth I shaded the shark using Ciaté Vintage and H&M Love at First Sight. I've also mixed these colours for a little more depth. When done shading I created the teeth with H&M Love at First Sight. Don't forget the eyes! Mine are done with the tip of the striper brush and Diamond Cosmetics I'm Raven About You.

Middle: Eek! A Shark!
The swimmer is made with a mix of Barry M Mushroom, H&M Love at First Sight and Hard Candy Splendid. His hair colour is Barry M Mushroom. Behind him is a shark fin that is made the way I made the shark fin on my pinky. I've added a little bit H&M Love at First Sight around the fin and the swimmer, it just gives a little more movement.

Index: Jaws
The Jaws logo is made with Eyeko Saucy. I've added a shark biting the logo. The colour of the gums is China Glaze Something Sweet and the teeth are made with H&M Love at First Sight. The sharks skin is a mix of Ciaté Vintage, Orly Mirror Mirror and H&M Love at First Sight.

Jaws Nail Art Design

After feeling like Bob Ross for one hour I was finally done and topped it off with China Glaze Fast Forward. I really like the shark, my dad didn't believe that I made that one so that was pretty funny. Now I want to make more stuff on my nails like this but it takes so long, I'm not that patient, darn!

Thanks for visiting and have a nice day!
Michelle

Jip & Janneke

Friday, October 15, 2010
Hey everyone! From 6 to 16 October we have 'Kinderboekenweek' here in the Netherlands, roughly translated as Children's Book Week, meaning there's a whole theme week about books, specially for kids. I remember that when I was a kid I always looked forward to Kinderboekenweek (and still do!). Meeting writers, teachers who will read you a whole afternoon, sitting with the whole school in the great hall with your pillow and read your own book. Very awesome. This years theme is 'imagery in children's books' and I think we all loved pretty pictures in our childhood books. One of the books I loved and still love is Jip & Janneke, written by Annie M. G. Schmidt, full of great drawings by Fiep Westendorp. Let me introduce them:

Jip en Janneke Children's Book Nail Art Design

On my pinkie you see Takkie the dog, next to it there's Jip, then we have Siepie the cat and last there's Janneke. Maybe you've seen them already because not only is the book Jip & Janneke translated in a few foreign languages, also the Dutch company Hema has released a limited edition collection of these four figures - you might have seen the nail polish that was a part from this collection.

Jip en Janneke Children's Book Nail Art Design

See, matchy matchy isn't it? This make up bag is one thing I scored out of the cute Hema collection. Jip & Janneke is one of my happy childhood memories and I truly love Fiep's drawings and Annie's stories. If you ever stumble across this book you should definitely have a peek in it!


For this manicure I used Diamond Cosmetics I'm Raven About You as my base colour and H&M Love at First Sight for the characters. I drew them by hand with a striper brush. In the picture above I've mattified it with China Glaze Matte Magic. Also, since I've been getting questions about the treatments I use: my base is NailTek Foundation II and I use the China Glaze Fast Forward top coat.

What is your favourite Childhood book?
Michelle

Inspired By

Tuesday, October 5, 2010
Hey guys! Hope everyone is doing well, I sure am. Recently I thought of a manicure that was posted a long time ago on my blog for a bugs nail art contest. Michèle did this gorgeous manicure that was inspired by a Monarch butterfly, you know, the butterflies that are all gorgeous and royal. I keep seeing this picture on the internet, it jumps up all the time and I decided to do one as well.

Red Butterfly Nail Art Design Monarch

I picked a red as my base, OPI Friar, Friar, Pants on Fire! The outlines are made with a black striper and the white dots are made with H&M Love at First Sight and my friend the dotting tool. I added some sweet baby pearls to the dots, one per nail, and that was it.

This nail art was really a pain in the ass because I do not have that much patience. I'm also a neat freak so the lines have to be perrrrrrfect or I'll be bummed. Can you imagine how I sat there?! It wasn't a pretty sight, that's for sure.

Red Butterfly Nail Art Design Monarch

Do you have any favourite nail inspirations? By that I mean sites (f.e. Tumblr or Wah), persons, idols, photos? I like to look at different kinds of fabrics to make up a pattern but unfortunately it has never worked out that well. I hope it will work out once, I love those kind of inspirations.

Take care and thanks for visiting!
Michelle

Stripes & Flowers

Monday, October 4, 2010
Good morning all! I hope everyone had a good weekend. Looking at the not that creative title of this post you probably guess what this one is about. Yes, you are right, I'm about to show you some stripes and flowers! Stripes and flowers must be my favourite thing to do when I'm bored of an old manicure or when I want something fun on my nails. It's not only easy, it's also fast and funky!

Remember I told you about the swap package with Karrie? Not only did she sent me a lot of pretty polishes, she also send some awesome nail art stickers along. I'm a big fan of nail art stickers because I can be terribly lazy and there's nothing more easy than using stickers. Everyone should have stickers - perfect for lazy nail art and spicing up a manicure fast.

Stripes Flowers Nail Art Design Stickers

I used the roses that Karrie sent me. They are so cute and glittery, I love them! But before I used those I did some stripes (of course! You know me!). First I painted my nails with Love at First Sight from the H&M and used a striper brush and Eyeko Nude Polish for the stripes. Take the stickers, seal it with a top coat and you're done.

Do you use stickers a lot? Why (not)?
Michelle

Halloween Themed: Graveyard

Wednesday, September 29, 2010
Good afternoon all! I have a themed nail art for you today, something I really enjoy doing. Because it's almost October I thought it was fun to start off with something for Halloween.

Halloween Themed Nail Art Graveyard Design

When I think of Halloween I think of spooky and scary things so I decided to go for a graveyard. This really was an easy design, I wanted to make a tutorial but I did this in the evening so it was too dark for pictures so I might do this some other time.

First off I started by painting my nails with Misa On the Edge, a gorgeous dark blue. I wanted it to look like night time and a little foggy so I decided to sponge a little. I used Misa On the Edge, H&M Love at First Sight and OPI DS Fantasy for this. After that I topped it with Essie Silver Bullions.

Halloween Themed Nail Art Graveyard Design

Second part of this manicure, using black and create outlines for the graveyard. I used a black striper but this is probably easier when you use a nail art pen. After creating these, you can colour them in. I didn't want it to be perfectly neat because with the black and blue a little mixed it looks like it's being lit by the moon or something, I think it's a nice little touch. The ghosts are created with a white striper.

Creating a tiny graveyard is fun, you can add pretty much everything you want. I added trees, different tombstones, crows and ghosts.

Halloween Themed Nail Art Graveyard Design

When you're done with the graveyard just top it off with a top coat and you're done!

Are you creating something special on your nails for Halloween?
Michelle

Shooting Stars

Wednesday, September 1, 2010
Shooting Stars Nail Art Design Star Glitter Viva La Nails

Hi guys! I still have some nail art stuff lying around that I've never used before and I decided to start using them. Now, I had some pink stars from Viva La Nails and you know I dislike pink so I started off with those.

Shooting Stars Nail Art Design Star Glitter Viva La Nails

First I painted my nails with China Glaze Something Sweet and I used my striper to add white (H&M Love at First Sight), pink (Ciaté Fun Fair), berry (Ciaté Main Stage) and 'reddish' purple (OPI DS Extravagance). After that I used white stars from the Essence Nail Jewels wheel and the pink stars from Viva La Nails. I topped this off with Nubar Diamont.

Well. How's that for a pink disliker! ;-) I took this off the next day because it really wasn't my colour but I'd like to try something similar with dark blue.

Thanks for visiting!
Michelle

Roses really smell like boo-boo

Sunday, August 29, 2010
Hi guys! Last day of the weekend and hopefully the last day of that much rain! It has been raining almost non stop here and it's not only a mood killer, it's also kind of a swatch killer. So sun, please come back. I miss you dearly! Today's post is with a swatch that isn't the best evahhh but I want to show you anyway. I did another version of the roses manicure.

Roses Nail Art Design Freehand

I used Color Club Uptown Girl as my base colour and Ciaté Main Stage and H&M Love at First Sight for the roses. The roses are swirled so if you want to do this practice on a paper first because you don't want to mix the two colours together into one. The leafs are swirled too, I used OPI Here Today, Aragon Tomorrow and OPI Green-wich Village for them.

I see these designs coming up more and more lately and I really like them. Have you tried this once? If so, show me! I like seeing other versions of this kind of manicure. :-)

Thanks for stopping by!
Michelle

Purple Marble

Friday, August 27, 2010
Hi guys! I did a water marble today and I really enjoy doing them. I hate the clean up though, to me that is probably the most awful thing I've ever done clean up wise. It doesn't matter what method I try, it always looks super messy (so I never show them). I used vaseline today, using a small paintbrush to greasen up my cuticles and guess what.. No more terrible clean up, NO MORE! Vaseline is my new hero for doing this stuff - I could swipe all the excess polish off with a brush.

As far as the marbling, I like the really neat patterns but I enjoy the crazy swirls more because of the difference in patterns. So for the first time on my blog, finally, a marble.

Watermarble Marble Purple Orly Lollipop Zoya Yasmeen Nail Art Nail Design

I used Zoya Yasmeen and Orly Lollipop for the marble. Excusez moi for the bad quality of the picture but it has been raining non stop which means craptastic lighting. Now, I could do a tutorial about marbling but you really want to see the queen of marbling do it: Colette from My Simple Little Pleasures. She has a lot of handy tutorials up so if you want to know more about marbling I highly recommend you visit her site (and youtube channel). :-)

What's your take on marbling? Do you like it or not?
Michelle

Nail Art Tutorial: Striped!

Wednesday, August 25, 2010
Hi everyone! As promised the nail art tutorial of my striped manicure. :-)

Striped Manicure Nail Art Stripes Tutorial How To Striper Zoya Ivanka Veruschka OPI Damone Robers 1968 Green-wich Village Essie Pretty Edgy

First of all, pick the colours you want to use. If you do this while working on this manicure (and you are terribly clumsy) you will have a chance of ruining your manicure and we don't want that to happen! I have used: Essie Pretty Edgy, OPI Green-wich Village, OPI Damone Roberts 1968, Zoya Ivanka and Zoya Veruschka. I'm someone who wants their colours to match otherwise I'll start to annoy myself but do whatever you like! :-)

The other thing you need for this manicure is a striper. You can use a small brush for this or a striper brush. Striper brushes can be bought apart or in a nail art brush set. Mine has gone to heaven a while back so I cleaned out a striper polish I never used and I took that striper brush.

Striped Manicure Nail Art Stripes Tutorial How To Striper Zoya Ivanka Veruschka OPI Damone Robers 1968 Green-wich Village Essie Pretty Edgy

Make sure you clean it right after you've used it, otherwise you'll mix up polishes. You can use a cotton pad soaked in polish remover for this.

Now, on to the manicure. After you have applied your base coat, apply your base colour. I chose OPI Green-wich Village as my base colour, a very fresh green. You can wait for it to dry but I'm always kind of impatient so I continue right away with the next step.

Before you start keep in mind you don't want too much polish on your striper. If so, than can turn runny and become a droopy mess on your nail. Is your line too sheer? Wait a minute and pull another line on top of the first.

1. Take a polish and dip your striper in it. Pull a vertical line from the bottom of your nail to the top. I've created one stripe on the left side of my nail with Zoya Veruschka.

2. Repeat step 1. I created two lines on both sides of my nail with OPI Damone Roberts 1968.

3. Again, repeat step 1. I created one line on the right side of my nail with Essie Pretty Edgy.

4. And for the last time, repeat step 1. I created two lines on both sides with Zoya Ivanka. After that you seal it with a top coat.

If you don't like to read, here's picture material. You can click on these for an enlargement:

Striped Manicure Nail Art Stripes Tutorial How To Striper Zoya Ivanka Veruschka OPI Damone Robers 1968 Green-wich Village Essie Pretty Edgy Striped Manicure Nail Art Stripes Tutorial How To Striper Zoya Ivanka Veruschka OPI Damone Robers 1968 Green-wich Village Essie Pretty Edgy

And the result:

Striped Manicure Nail Art Stripes Tutorial How To Striper Zoya Ivanka Veruschka OPI Damone Robers 1968 Green-wich Village Essie Pretty Edgy

Done! Easy nail art that everyone can create. If your hand isn't that steady make sure your wrist rests on something, like a table. This way your hand doesn't shake that much. I hope this was helpful for you!

Have a great day!
Michelle

The Nightmare Before Christmas

Tuesday, August 24, 2010
Hey all! Did you survived your Monday? :-) There are a few things I want to do nail wise and one of them was making Jack Skellington on my nail. I absolutely love the movie 'The Nightmare Before Christmas' and since Jack is my favourite animated movie character the choice was easily made.

Jack Skellington Nail Art Nightmare Before Christmas Nails Freehand

I used Diamond Cosmetics I'm Raven About You as my base colour, my favourite black because it's opaque in two coats (I don't own one that does the same without leaving streaks.. hmm) and Jack and the stitches are made with H&M Love at First Sight and a striper. Why I did stitches? I don't know but I didn't want to leave my nails blank - next time I'll try a full Nightmare Before Christmas manicure.

Have a nice day!
Michelle

Herôme W.I.C. Graffiti Nail Art

Sunday, August 22, 2010
Herôme World Inspired Colours Graffiti Nail Art Review

Hi guys! A while back Herôme brought a new line to their already existing World Inspired Colours Collection: Graffiti Nail Art! This line is based on graffiti and other modern arts and all the polishes are named after hip, artistic districts in the city New York such as East Village Manhattan and Brooklyn. The Graffiti Nail Art line is very similar to other stamping products and they also offer a scraper, stamp, stamping polishes and plates.

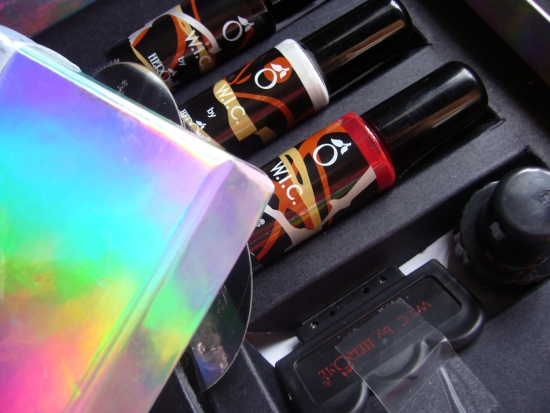
As you can see above the products arrived very nicely. Every single set is packed in a very pretty holographic box with a bow on it. You can't go wrong with holographic! :-)

Herôme World Inspired Colours Graffiti Nail Art Review

Sets

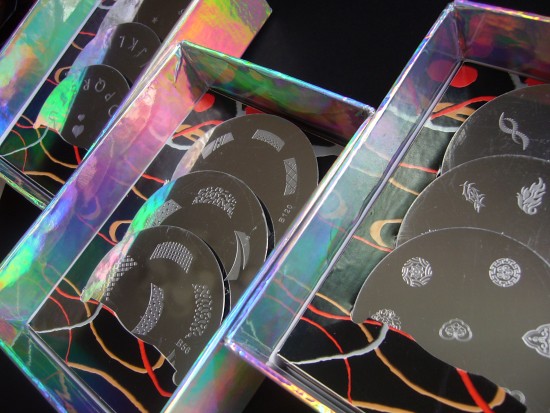
I received the Get Started kit as well as three sets of plates, called Fancy, Say It! and Tips. Herôme only offers sets of plates; you can't buy these single. You also have to buy the Small or Get Started kit if you want to have a stamp and scraper. The polishes can be bought alone. I like the idea of sets but I think it would be even more handy if all plates and the stamp and scraper were also sold single. That way you can see for yourself what you'd like to receive and, for example, not end up with a plate you never use.

Get Started Kit

The Get Started Kit contains a scraper, a stamp, three plates (B41, B77 and B44 - the set is called Flowers) and three special polishes: red (Soho Manhattan), black (Brooklyn) and white (Lower Manhattan). Like the name already tells you, this is a starters kit. I think this kit has everything you need to get known with this product but if you think it contains too much there's also a smaller kit called, very surprising, the Small Kit. These kits also contain a little guide with examples how to use everything.
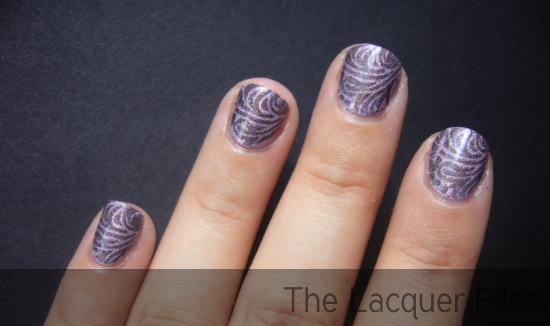
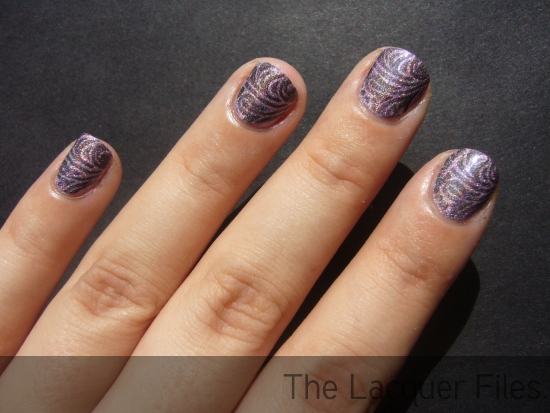
Herôme World Inspired Colours Graffiti Nail Art Review

Plates and Stamping

As you might have seen the plates Herôme offers look a lot like Konad plates. Some designs are the same as the designs on Konad plates, others aren't. This isn't necessarily a bad thing: €7.50 for three plates makes a good, cheap and easy to reach "Konad dupe". You use the plates the same as the other stamping plates around: you put polish on the plate, use the scraper, use the stamp and place the design on your nail. The Herôme plates work good and there's no trouble here with picking up the designs. For a how to check out their site!

These plates don't have a backing and that means that you should be careful because they are sharp! The ridges can easily cut your fingers. The scraper is from metal and if you press too hard it can damage your plate so be careful with that. I'd love to see a plastic scraper that comes with it.

Herôme World Inspired Colours Graffiti Nail Art Review

Polishes

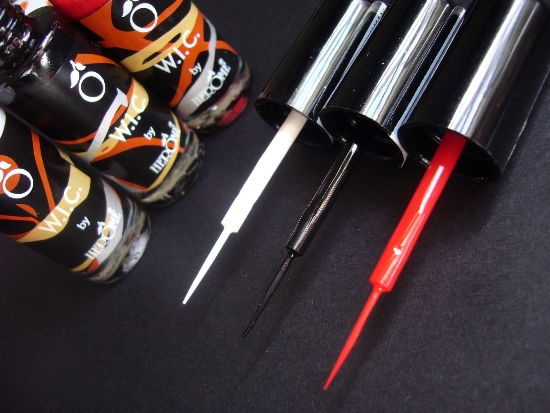
Hey, how sweet is this? Not only can the polishes be used for stamping, they're also stripers! Now I love this because I'm a BIG fan of stripers. These stripers have long, thin brushes and the cap is easily to hold. I want more of them!

Using these polishes for stamping also works fine. They are thinner than other stamping polishes so if you're starting with this form of nail art you might have to practice a little longer. Also the polishes aren't in your face pigmented - they are pigmented enough but still look a little 'faded'.

Herôme World Inspired Colours Graffiti Nail Art Review Herôme World Inspired Colours Graffiti Nail Art Review

Designs

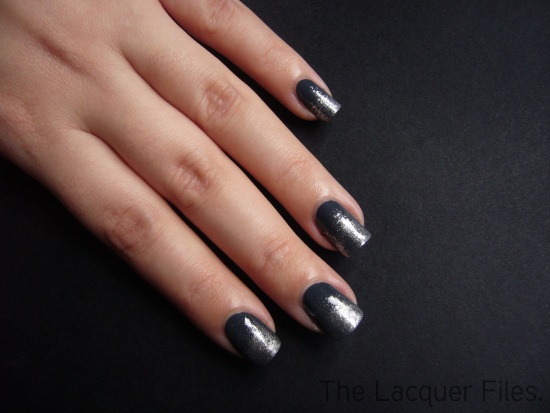
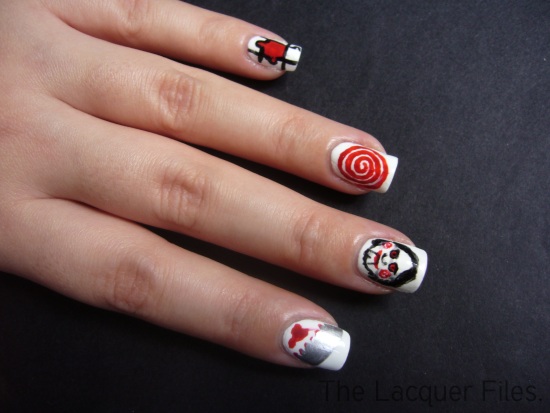
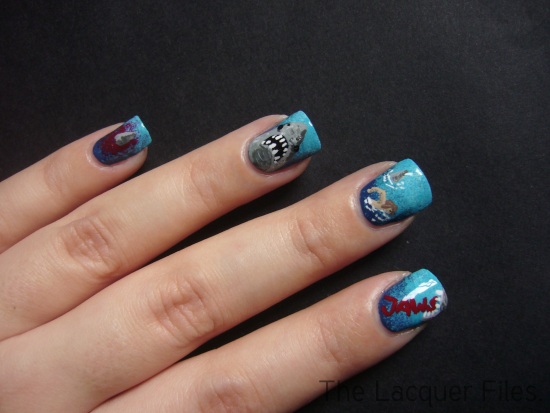
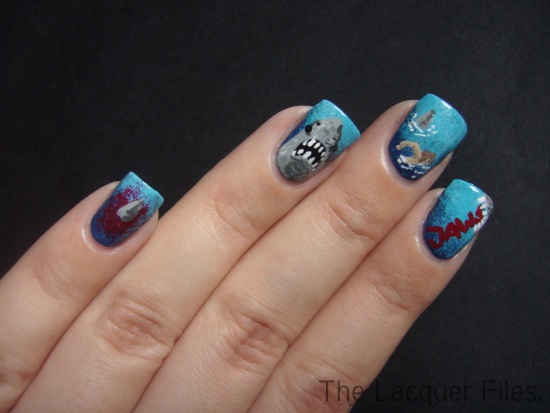
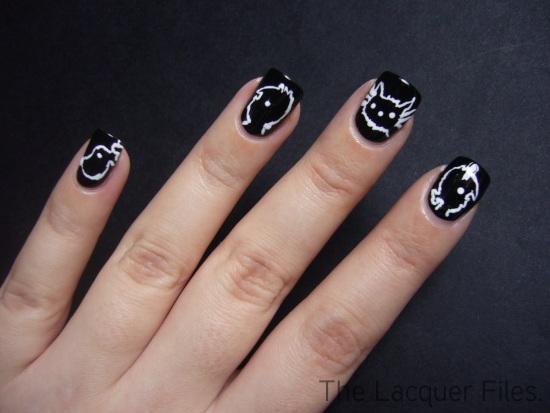
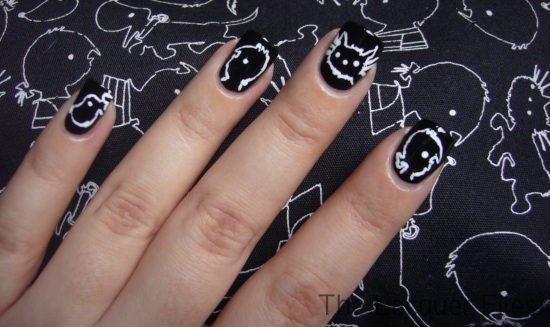
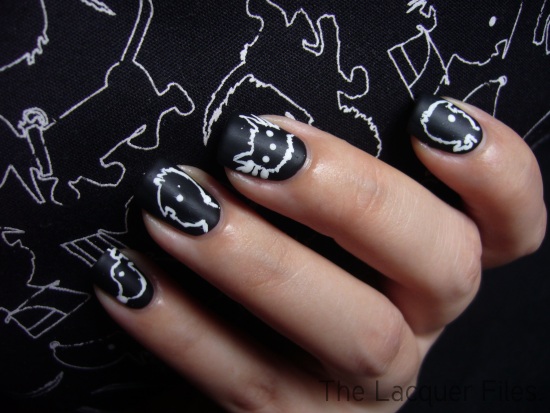
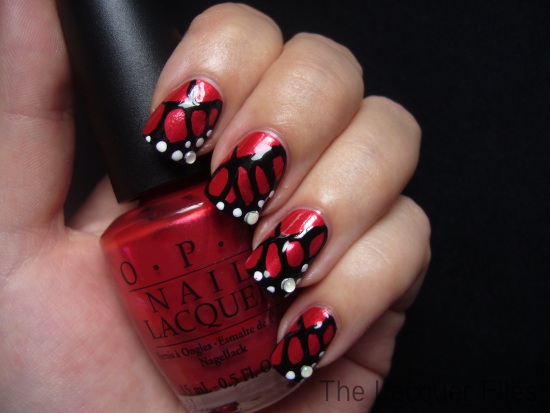
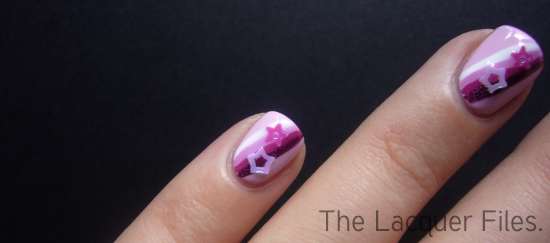
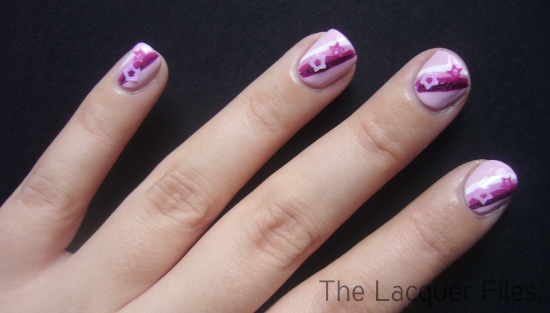
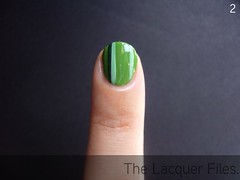
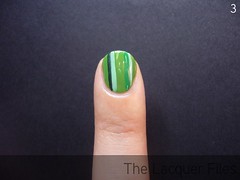
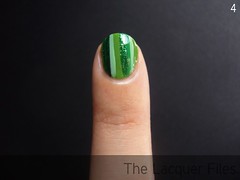
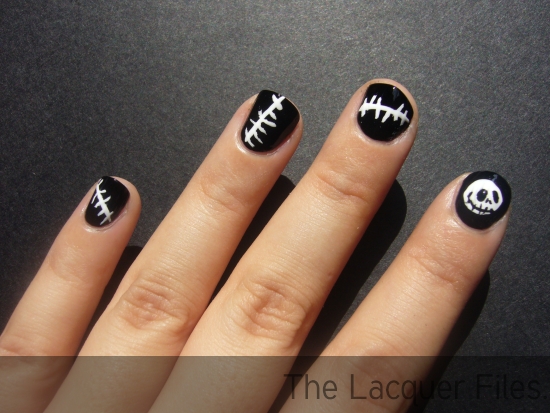
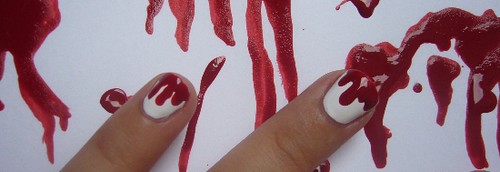
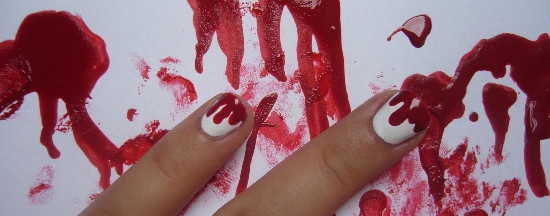
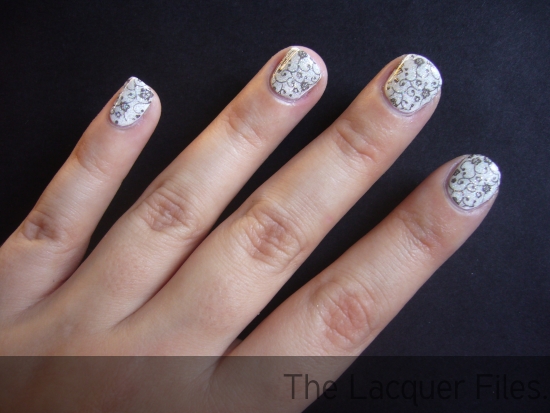
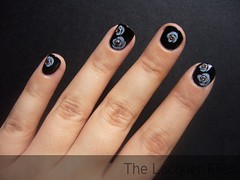
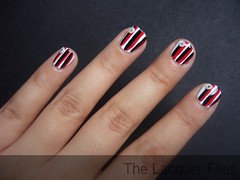
As you can see above I've made two designs. The first design is made with plate B44 and Lower Manhattan. The second design is made with Soho Manhattan and Brooklyn. You can click on these for an enlargement.

I used a regular black and white polish as my base for these two manicures because I don't own cremes from Herôme. The nail jewels aren't from Herôme.

Details

The W.I.C. Graffiti Nail Art products are exclusively available at Herôme's webshop. The Get Started Kit costs €24.95, the plates per set costs €7.50 and the polishes are available for €7.50.

Herome is being sold in Germany, France, Belgium, Switzerland, Denmark, Austria, Australia and New Zealand. The Herôme products are distributed by wholesalers, drugstores, perfumeries, beauty salons and the internet.

These products are provided by Herôme for consideration. For more information read my Disclaimer.

Horror Nail Art Contest: The Winner!

Wednesday, August 18, 2010
Horror Nails Nail Art Design HM Love at First Sight Orly Poison Apple

Hi guys! First of all I'd like to thank everyone that has taken the time to vote in the Horror Nail Art Contest - and there are a lot of votes! Almost everyone shared some thoughts and they were so kind! A lot of people found it difficult to choose a winner because they thought all the manicures were amazing and very creative.

A few comments on the one that won:
EW! That means it has achieved the proper effect!
I want to wear this next Halloween!
These are the most scary I've seen in a while.
They are horrific!
Almost real!

The manicure that won, is Thifa's manicure!
Congratulations Thifa, please contact me with your address! :-)

I'd like to thank everyone that has participated. You guys were so creative and you made me want to do my own horror manicure! :-)

Horror Nails Nail Art Design HM Love at First Sight Orly Poison Apple

I'm wearing H&M Love at First Sight and used Orly Poison Apple for the blood.
Thanks for the inspiration and have a nice day!

Pink & Grey Holo

Monday, August 16, 2010
Hey everyone! It's Monday and that means the week is starting all over again but it also means that I'm coming home from vacation today! I always like coming home after a while and be able to sleep in your own bed, have your own stuff around you and all of those small things. I guess you understand what I mean. :-)

The last scheduled post is, how surprising, a holo post.

Pink Grey Holo Shade

I first painted my nails with Color Club Fashion Addict, a really light pink holo. After that I stamped with Bundle Monster plate 19 and Color Club Revvvolution. These polishes also work very well for stamping - maybe I should create my own database of good stamping polishes on the blog haha. In the shade, as you can see in the picture above, it is nice but not special.

Pink Grey Holo

Much better when the sun is out, don't you agree? :-)
Thanks for stopping by and I'll be talking to you soon!

Fairy Flowers

Sunday, August 15, 2010
Hi guys! How was your Saturday night? I hope it was good! A while ago I stamped with OPI Russian Navy, the first time I ever stamped with a matte/suede. I really liked the effect and so I wanted to try it again, only with a different polish.

For this manicure I used ManGlaze Matte is Magic as my stamping polish. It did work however it wasn't black (more greyish) and a little thin. If you want to try this yourself: be fast! Mattes and suedes dry very quick.

Fairy Flowers

I used H&M Love at First Sight as my white base colour. I'm really satisfied with this white polish because it's super pigmented and I only need two coats but it's really thick. I need to remind myself to thin it! So the stamping is done with ManGlaze Matte is Murder and Konad imageplate M73. After that I topped it off with China Glaze Fairy Dust.

Fairy Flowers

It doesn't show that well in pictures but Fairy Dust is really a nice addition. It's so sparkly  and I love holographic glitter! 

Thanks for stopping by!

New: Stamping Polish Database!

Saturday, August 14, 2010
Hey everyone! I've been a busy bee and started with an idea I've had for a while: creating a stamping polish database. Using regular polish is a nice addition to the whole Konad, Fauxnad and Bundle Monster experience and therefore I created this database.

Special thanks to Sasse's Stamping Stampede for the already huge list of regular stamping polishes and dearie Michèle for putting tabs and a table on my blog.

You can find the Stamping Polish Database here!

If you have any questions, suggestions or additions you can always send me an email, tweet or leave a comment. Let me know what you think! :-)
© The Lacquer Files | Disclaimer | Want to use my content? Email me first!

This work is licensed under a Creative Commons Attribution-NonCommercial-NoDerivs 3.0 Unported License.