Nail Art Tutorial: Striped!

Wednesday, August 25, 2010
Hi everyone! As promised the nail art tutorial of my striped manicure. :-)

Striped Manicure Nail Art Stripes Tutorial How To Striper Zoya Ivanka Veruschka OPI Damone Robers 1968 Green-wich Village Essie Pretty Edgy

First of all, pick the colours you want to use. If you do this while working on this manicure (and you are terribly clumsy) you will have a chance of ruining your manicure and we don't want that to happen! I have used: Essie Pretty Edgy, OPI Green-wich Village, OPI Damone Roberts 1968, Zoya Ivanka and Zoya Veruschka. I'm someone who wants their colours to match otherwise I'll start to annoy myself but do whatever you like! :-)

The other thing you need for this manicure is a striper. You can use a small brush for this or a striper brush. Striper brushes can be bought apart or in a nail art brush set. Mine has gone to heaven a while back so I cleaned out a striper polish I never used and I took that striper brush.

Striped Manicure Nail Art Stripes Tutorial How To Striper Zoya Ivanka Veruschka OPI Damone Robers 1968 Green-wich Village Essie Pretty Edgy

Make sure you clean it right after you've used it, otherwise you'll mix up polishes. You can use a cotton pad soaked in polish remover for this.

Now, on to the manicure. After you have applied your base coat, apply your base colour. I chose OPI Green-wich Village as my base colour, a very fresh green. You can wait for it to dry but I'm always kind of impatient so I continue right away with the next step.

Before you start keep in mind you don't want too much polish on your striper. If so, than can turn runny and become a droopy mess on your nail. Is your line too sheer? Wait a minute and pull another line on top of the first.

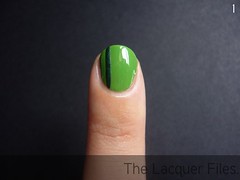
1. Take a polish and dip your striper in it. Pull a vertical line from the bottom of your nail to the top. I've created one stripe on the left side of my nail with Zoya Veruschka.

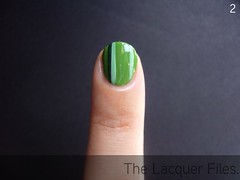
2. Repeat step 1. I created two lines on both sides of my nail with OPI Damone Roberts 1968.

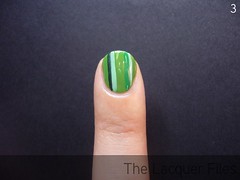
3. Again, repeat step 1. I created one line on the right side of my nail with Essie Pretty Edgy.

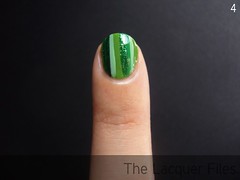
4. And for the last time, repeat step 1. I created two lines on both sides with Zoya Ivanka. After that you seal it with a top coat.

If you don't like to read, here's picture material. You can click on these for an enlargement:

Striped Manicure Nail Art Stripes Tutorial How To Striper Zoya Ivanka Veruschka OPI Damone Robers 1968 Green-wich Village Essie Pretty Edgy Striped Manicure Nail Art Stripes Tutorial How To Striper Zoya Ivanka Veruschka OPI Damone Robers 1968 Green-wich Village Essie Pretty Edgy

And the result:

Striped Manicure Nail Art Stripes Tutorial How To Striper Zoya Ivanka Veruschka OPI Damone Robers 1968 Green-wich Village Essie Pretty Edgy

Done! Easy nail art that everyone can create. If your hand isn't that steady make sure your wrist rests on something, like a table. This way your hand doesn't shake that much. I hope this was helpful for you!

Have a great day!
Michelle

Comments (22)

Loading... Logging you in...
  • Logged in as
I love these stripes! I think you choose polishes that fit very well together
Wow, that's soo beautiful!
;O
Great tutorial! Will have to try this out when I get a thin brush :) And I agree, the colours you chose work very well together. Before seeing the end result, I didn't like the sparkly from Zoya together with the rest - but I sure do now! Great way to mix cremes and sparkles!
1 reply · active 770 weeks ago
I like adding something 'special' to the design haha, otherwise I'm bored quickly! :-D Thanks for the compliment!
ziet er erg mooi uit !!!!
Thank you for the tutorial - I think I will be using this method asap!
Moet ik toch ook 'n keertje proberen eigenlijk, zo makkelijk!
VERY cute!!! This would also look adorable with a little flower sticker or two as well... sort of a mod influence. Thanks for the inspiration!! I may have to build on this idea myself...
1 reply · active 770 weeks ago
I've tried that once and it really does look adorable! :-)
Love this! This is one of the most inspiring nail tutorials I've seen in a while. Not TOO difficult, but still really cute and creative.
Thank you :)
x
Thanks for that Tutorial, it's lovely!
Bravo! :)
Nice!!! And I love green, so win-win situation here lol
Beautiful! I'm not a green girl, but this looks great!
This is amazing!
Love it!
good tuto !!! I tagged you on my blog http://juicy-nails.blogspot.com/
1 reply · active 770 weeks ago
Thank you! And of course, thank you for the tag. I don't do anything with the tags I get because that would give me an awful lot of work but I appreciate them very much. :-)
i love this !!!!
Thanks for all your sweet comments!
Dat ziet er echt super leuk uit! Netjes en mooi :D

Post a new comment

Comments by

© The Lacquer Files | Disclaimer | Want to use my content? Email me first!

This work is licensed under a Creative Commons Attribution-NonCommercial-NoDerivs 3.0 Unported License.