Nail Art Tutorial: Ruffian Manicure

Saturday, July 31, 2010
Hey all! Today I'd like to show you how you can create a Ruffian freehand. It's not that hard and all you need is a bit of patience, a steady hand and maybe a little bit of practice!

First you start with cleaning your nails and applying a base coat. After that it's colour picking time! I like Ruffians with metallic shades, matte shades and contrasting shades but this is really your choice.

Nail Art Tutorial Ruffian Manicure China Glaze Millennium

I picked China Glaze Millennium as my base, a silver metallic. Let it dry. Metallic shades dry pretty quickly but when you're using a polish that doesn't dries that quickly make sure you wait a few minutes before starting your Ruffian. You don't want to have polish mixing or pick up your base colour with the brush.

Dry? Let's start with step 1.
Like applying nail polish on your entire nail, you place a drop of polish on the center of your nail. Push the drop of polish a little bit down so you can decide where the Ruffian ends. After that you move your brush upwards, creating a vertical line. I use H&M Love at First Sight as my second colour.

Step 2: Start again on the left (or right) side. Pick the brush and swipe the polish upwards along the curve of the nail. Make sure the whole side is covered with nail polish.

Step 3: Repeat step 2 only on the other side.

Nail Art Tutorial Ruffian Manicure

Nail Art Tutorial Ruffian Manicure

Nail Art Tutorial Ruffian Manicure

See how easy it basically is? You create the Ruffian just like you normally paint your nails, you only start on a higher point of your nail. If you are scared to do this freehand you can always use french tip guides. When you do so you must let the base colour dry completely, otherwise you'll pull off all the polish. I'm not a big fan of tip guides because they tend to get all sticky on my nails and they leave me with glue on my nails but if it works for you, why not?!

After that, seal with a top coat and this is the result:

Nail Art Tutorial Ruffian Manicure

Hope this was helpful and don't forget: practice makes perfect!

Kinetics - Luxury Purple

Friday, July 30, 2010
Hi everyone! I have one last Kinetics to show you guys. This brand really has hit my favourite brands list in no time! I love the formulas, the colours and the bottles. If you're able to get some Kinetics yourself, please do because  you won't regret it!

Kinetics Luxury Purple

I'm wearing Luxury Purple. Unfortunately I don't have much good lighting now due to the rain and clouds but this is quite accurate. Luxury Purple is a cool toned purple glitter. I'm wearing three coats and it applied very smoothly, not letting you end up with big chunks of glitter everywhere like some others do.

I have lots of purple glitters but this one is something new. Like I said, it isn't the warm toned dark purple glitter, it's cooler and a little bit paler and often you'll see a blue glance instead of a gold one. I'm very pleased with this one! What is your favourite purple glitter?

This polish was send to me by Alice and Jo's for consideration. For more info you can read my disclaimer.

Catrice - Oriental Orange

Thursday, July 29, 2010
Hi everyone! Today the second polish of the Catrice Caramé collection. I really like the idea of this collection - it's based on an evening stroll on the bazaar - and I think they've come up with great colours. Especially the bronzes in this collection got my attention but after trying out Oriental Orange I'm glad I didn't missed this one!

Catrice Oriental Orange

Oriental Orange isn't a true orange, it's more of an orange toned red jelly. Yes: jelly! I love jelly finishes and this is no exception, it's really glossy. I wanted to build this one and see if I could get it opaque but after four coats I still had a visible nail line. But who cares, that's a common fact when wearing jellies and it doesn't disturb me at all. Application was smooth and the Catrice brush is one of my favourites.

Conclusion? Worth buying! Just think of this: great price tag (€2,49), cute bottle, limited edition and it's a jelly. WIN.

Blue Gradient

Wednesday, July 28, 2010
Hey all! I've got another gradient manicure for you today. I like this one wayyyy better than the pink I did before but that's probably because it's my favourite colour: BLUE.

Gradient Nails Blue

The base colour is China Glaze For Audrey, the second colour is Zoya Robyn and the dark blue is Misa On the Edge. I've topped the gradient with China Glaze Snow Globe, different sizes of glitter that gives a really nice effect. For this one I've also used a simple cleaning sponge cut into pieces.

That's it for today, not much too share. I have a headache so that's why the post is so short.
Have a nice day!

Subtle Silver Konad

Tuesday, July 27, 2010
Hello everyone! I haven't done much Konad the past weeks but I really like to use it. It's easy, quick and the designs are very nice and divers. If you haven't used Konad before you can always order a set or look out for the Essence Stampy Set, a cheaper version that is great for trying out.

Diamond Cosmetics Matte Smoke stamped with Orly Shine and Konad Imageplate M60

Normally my designs aren't this subtle, I like it when the Konad pops out, but this one I really liked. I'm wearing Diamond Cosmetics Matte Smoke as my base colour, a matte grey. I needed two coats to get it opaque and even. As my stamping polish I used Orly Shine from the Foil FX collection. The polishes from this collection are great for stamping just like the Romantiques and Khromes from China Glaze. The plate I used is Konad imageplate M60.

What is your take on subtle Konad designs like these?
Have a nice day everyone!

Zoya - Ivanka

Monday, July 26, 2010
Hey guys! How was your weekend? Hope you had a good one. Today I'm showing you another polish from Zoya's Sparkle collection. I've showed you Charla before and today it's Ivanka's turn!

Zoya Ivanka Sparkle Collection

Ivanka is a green jelly that is packed with gold and green glitter. It's hard for me to turn down a green, I absolutely love almost every single green colour, but this one is my new number one on the green list. The sparkle, the glow, the glitters. It's absolutely amazing. Zoya did a great job on these sparkles. In the picture I'm wearing three thin coats of Ivanka. The application was good, maybe a little watery, but I had no problems with it.

Zoya Ivanka Sparkle Collection China Glaze Matte Magic

Meet Ivanka in matte. I've used China Glaze Matte Magic to mattify this pretty and it's also very pretty. The golden glow stays when matte and that makes it really nice. What else is there to say?!

How do you feel about Ivanka and the rest of the Sparkle collection?

Cheese gone bad.

Saturday, July 24, 2010
Hi everyone! I'm back a little early because I won't have time tomorrow. The plan for tomorrow is to marble my nails and then help my friend Janina with setting up stuff for her birthday later that day. Since I'm a lazy person I need a lot of time getting ready so I really need the whole morning for that.

Nail Art Color Club Almost Famous with Essence Nail Art Striper black and silver and dotting tool

Showing you this manicure feels kind of weird. I wasn't aiming for a super cute or awesome design and I really don't know what it's supposed to be but I do like it. The yellow is Color Club Almost Famous, a bright yellow creme that reminds me of cabs and school buses. I love it and will wear this regularly in the summer. Application was fine, a bit streaky but manageable. After three coats it was opaque. For the black and silver stripes I used my Essence stripers. The dots are made with a dotting tool.

About the name: I wanted to call this one yellow but that didn't fit! I asked around and Michèle came with wonderful suggestions so I picked this one.

Nail Art Color Club Almost Famous with Essence Nail Art Striper black and silver and dotting tool

What do you think?

Thanks for visiting and have a great day tomorrow!

Review: Yu-Be Moisturizing Skin Cream from Japan

Friday, July 23, 2010
Hi guys! A while ago I bought myself this tube of skin cream from Yu-Be. Yu-Be is founded by Japanese pharmacist Yoshikiyo Nowatari in 1957 and ever since it has been a favourite for many. The whole Yu-Be line consists of caring products for the skincare your body needs.

Yu-Be Moisturizing Skin Cream

According to Yu-Be this skin cream can be used everywhere, even the face and lips and it helps to heal split cuticles and smooth rough, dry skin on hands, elbows, knees and feet. It absorbs instantly, works for hours and it helps to protect and moisturize your skin exposed to cold, wind and water.

The ingredients:
- Glycerin. This natural ‘humectant’ attracts and retains moisture in the skin.
- Vitamin E. Natural anti-oxidant and skin protector helps aid healing and reduce scarring.
- Vitamin B2. Helps to smooth rough or damaged skin and gives Yu-Be its yellow colour.
- Camphor. Helps soothe irritation, scent disappears quickly leaving the skin feeling healthy.
- Vitamin C. Natural anti-oxidant and skin protector helps improve elasticity in skin.
- Sodium Hyaluronate: Humectant helps retain moisture to smooth rough skin and reduce fine lines.

Now, that sounds promising, doesn’t it? I was very eager to try this out myself!

Yu-Be Moisturizing Skin Cream

Yu-Be is a thick, yellow cream and it’s quite greasy. It does absorbs quickly and your hands (or other parts of your body) feel soft and smooth. Also one thing I was surprised about was the smell. When smelling the cream coming out of the tube, there’s no scent but when you moisturize your hands with it, you can smell a real earthy, menthol scent. It actually smells a bit like a Turkish steam bath! After doing this you’ll notice the smell slowly fades away and you can’t smell anything. A big plus for me, I dislike my hands smelling like crazy drugged flowers after applying hand cream (well, except for Avoplex that is).

After using this for one month my hands and rough elbows look and feel better than they did before. I’m really happy with this cream since it gives me an instant feeling of smoothness and you don’t need much of the cream for moisturizing. I will use this cream in winter because it’s a little too greasy for my in the summer. Besides, my skin doesn’t look that bad in summer, it only turns crazy when winter. Overall, I’m definitely going to repurchase when I run out.

You can buy Yu-Be skin cream on their site, www.yu-be.com. A 1.25 oz tube costs $15 and there are also other types available (chap stick, jar, lotion). For us Dutchies Yu-Be is easily to find and order on Alice’s and Jo’s.

Nail Art Tutorial: Ladybugs

Thursday, July 22, 2010
Hi all! Today I've got another nail art tutorial for you and it's an easy one. I've done a ladybug manicure a while ago and I got lots of responses asking how I did it because it looked hard. Well, it isn't!

Nail Art Tutorial Ladybugs DesignFor this manicure you need a red polish, stripers in the colours black and white and a dotting tool. If you don't own a dotting tool you can always use a toothpick or a rosewood stick. The red polish I used is the Saucy polish from Eyeko, my stripers are the Essence Heavy Black and the white tippainter and my dotting tool comes from a web shop. Dotting tools are really handy and easy to use so I'd buy one, you'll never know when you feel like dotting up a manicure. There are lots of these available in the world wide web so be on the look out! They aren't expensive at all and a great addition to your nail art stuff.

On to creating the ladybugs! You create these in six easy steps. You can grasp it by only looking at the pictures but I'll give you an explanation by each step.

Step 1. After applying the base coat you'll paint your nails in red. This doesn't have to be super neat because you can always clean up your nails when you're done.

Applying the base coat is very important, especially when you're using pigmented polishes like this Eyeko one. You don't want to end up with crazy stained nails, do you? For a clear and good guide on how to do your clean up, please have a look at Lacquerized, Michèle has a great one.

Step 2. When your nail polish is dry you can start using your black striper. Draw a line from the lower centre of your nail upwards. This is also easy to do but make sure the hand you're using rests on a table. This way your wrist is leaning on something and that makes it less shaky. The reason you want your nail polish dry before using the striper is that if it's not, you can pull the just applied nail polish off the nail.

Step 3. Draw a line with your striper above the middle of the vertical line. You want to draw this towards the upper right corner of your nail so don't draw a straight line: make it go upwards. After that you can colour in the red, making a black square.

Step 4. Repeat step 3 only with the other side of your nail.

Step 5. Use your dotting tool to create random black dots on your nail. I always use a paper where I can drop a little polish on and dip my dotting tool in there.

Step 6. You do the same for the eyes except you're doing this with white polish.

And... Done! Below are the pictures to make my text more clear. You can click these for an enlargement.

ail Art Tutorial Ladybugs Design ail Art Tutorial Ladybugs Design

Seal your design with topcoat and you'll have a few days of pleasure looking at your nails. Now I could show you my fingernails, but I'm not. I like this design as my pedicure and that is what I'll be showing. The first time I'm showing my feet here and if you don't like feet: don't watch it then.

ail Art Tutorial Ladybugs Design

Hope this was helpful!

Roses

Wednesday, July 21, 2010
Nail Art Design Roses Catrice Berry Bazaar China Glaze For Audrey H&M Love at First Sight OPI Green-wich Village OPI Here Today, Aragon Tomorrow

Hey guys! You're probably familiar with the roses manicure that lots of people seem to fall for. A few days ago I decided to try for myself. Seeing such a manicure makes you think it's really difficult but here's a secret for you: it  isn't! You can paint the roses using a brush or you can use the 'swirl' technique. You put a few drops of nail polish on your nail and swirl these colours so that they blend a little. You can use a toothpick for this but also a rosewood stick or even a dotting tool.

Nail Art Design Roses Catrice Berry Bazaar China Glaze For Audrey H&M Love at First Sight OPI Green-wich Village OPI Here Today, Aragon Tomorrow
In the picture on the right you see what I've used and you can click it for an enlargement..

For the roses I used Catrice Berry Bazaar and H&M Love at First Sight. The leaves are created with OPI Green-wich Village and OPI Here Today, Aragon Tomorrow.

My base coat is China Glaze For Audrey, one of my favourite polishes all time. In the end I used Viva La Nails larger glitters.

I'd love to write a tutorial about this but... There's already one in town. You can find it on a Dutch website called Beauty Lab. Make you sure you have a look on the other nail art tutorials too, these contain clear pictures and she always comes up with something cute.

Nail Art Design Roses Catrice Berry Bazaar China Glaze For Audrey H&M Love at First Sight OPI Green-wich Village OPI Here Today, Aragon Tomorrow

Have a nice day!

Catrice - Bronzed Brown

Tuesday, July 20, 2010
Hi everyone! As some of you might know, Catrice has a new limited edition collection called the Catrice Caramé collection. These colours are based on an evening stroll on the bazaar. The polishes that came out in this collection are Bronzed Brown, Spiced Bronze, Oriental Orange and Berry Bazaar.

Catrice Bronzed Brown

This is Catrice Bronzed Brown, a warm shimmery brown. Unlike some of Catrice's core polishes, this one was not so thick and it was easy to apply. I really like the brush because it's not too small or too big: it's right in the middle! I needed two coats of this one to get an opaque result.

I don't wear browns that much but I think I'll wear this one a lot in fall. The Catrice polishes cost €2,49 which is incredibly cheap for good quality polishes like this. If you want to buy yourself one or you're looking for someone to do a CP for the pretties from the LE make sure you'll be there on time. Before you know it they're gone!

Thanks for visiting!

Pink to Purple

Monday, July 19, 2010
Nail Art Design Gradient Nails Pink

Hi guys! I've been really really really busy with all sorts of nail art these couple of days. I find myself wearing designs I didn't think I would wear and it's really fun learning yourself to create new things. Today I want to show you the gradient nails I did.

Nail Art Design Gradient Nails Pink

I've used a simple cleaning sponge for this because I couldn't find any old make up sponges, it worked pretty good though. I find gradient nails quite difficult to like because I always feel the line of the colours mixing to come off quite hard. Well, they do when I try this. I used Ciaté Fun Fair as my base colour and used Ciaté Main Stage and Talent Scout for the gradient. After that I used Essie Silver Bullions for a little bit of glitter and Essence Nail Jewels for some bling. Do I like this? No, not really, I don't like the transition of the colours. I'll try a gradient with other colours today and I hope I'll like that one more.

Have a nice day!

Tropical Turquoise

Sunday, July 18, 2010
Hi everyone! Once in a while I like to create nail art I'd never wear or that looks really difficult to me. Linda showed me a nail magazine that has some pretty nice tutorials and I decided to make the Tropical Turquoise one yesterday evening. You can find the tutorial here. Now, I know it's in Dutch but they've created a very clear and easy to follow movie so it doesn't matter which language you speak.

The result of my creativeness (and boredom) last night:

Nail Art Design Essence Stripers Black Silver Dottingtool Charlotte Russe Essie Silver Bullions China Glaze Towel Boy Toy

Tropical Turquoise Tropical Turquoise

You can click the pictures for an enlargement. I think it came out pretty nice. My nails are a little too short so I had to fill them up more than I'd like but it looks fun and I think I'll create a little bit more of these kind of designs. It's really fun to do!
Polishes
I started off using China Glaze Towel Boy Toy, topped that with the nameless green of Charlotte Russe and Essie Silver Bullions on top of those two. I've used the Essence stripers for the flowers. For a finishing touch I've used the aqua and AB coloured rhinestones from Dollar Nail Art.

Would you consider creating a design like this yourself or would you rather have someone else doing this for you? Why?

Have a nice day and see you later!

New Limited Eyeko Releases

Saturday, July 17, 2010
Eyeko Limited Edition Rain Polish and Saucy Polish

Hi everyone! Eyeko recently released two new limited edition shades and today I'll show you these. Eyeko polishes come in 8.5 ml and every polish bottle has its own unique design. We're starting with the Saucy Polish for Naughty Nails.

Eyeko Limited Edition Saucy Polish

Saucy polish reminds me of fire trucks and tomatoes. I'm loving this shade of red. It's bright and vibrant, not muted at all and still it's a very wearable shade. Application was good, the formula is a little thick but this didn't turn me off. I actually kind of liked it! The great thing about applying it is that the polish comes on evenly and it doesn't give you the visible streaky brush strokes. In the picture I'm wearing two coats because of visible nail line (thanks, macro) but this a one coater - very pigmented.

Let's move on to the second polish, Rain Polish for City Nails.

Eyeko Limited Edition Rain Polish

A nice muted greyish blue with shimmer. The shimmer isn't that noticeable in normal light, when your nails catch the sunlight it will show more. This was a little thinner and it took me more effort to get this one on even. The polish is also very pigmented but because it's a little thinner I needed two coats of opaqueness. 

My thoughts on these two? Saucy Polish has surprised me the most. I, not being a red polish lover, would wear this one quite a lot because it is so vibrant and pretty. Rain Polish is also a very nice one. I guess you could say I'm really pleased with these two!

These polishes are sent to me by Eyeko. Their polish costs 3,50 pounds individually but  they also offer cute polish sets so be sure to take a look!

Win me in a Bottle!

Friday, July 16, 2010
Hello dear readers, I'm back a little early but it's for a good thing. I'll be showing you a polish that you can win - so read on for a description, pictures and the details of this one bottle giveaway.

Zoya Michelle

Here she is. Zoya Michelle. I love things with my name in it so I had to buy this polish, even though it was pink. When I had it in my hands I noticed HOW pink it is - and you all know I'm not a pink polish girl. Michelle is a bright medium pink with lighter pink shimmer in it so it'll give you a pretty pink flash. Applying it was good, like all Zoya's I own, but why does it had to be pink? Why isn't my name polish blue or green or a freaky mud colour?

That's why I decided to make one of you the new happy owner of Michelle. If you want to receive this baby, please leave me a comment with your email address in it. Also make sure you follow me through GFC so I can check. You can earn one extra entry by tweeting/blogpost/sidebar as long as you provide the link. This is open internationally and will close on July 31, 11:59 CET time, the same date as my horror nail art contest (if you haven't joined yet, please have a look!). I pick the winner with random.org.

Good luck!

Kinetics - My Blue Heaven

Hi guys! How are you all doing? Today I'll be showing you a polish from Kinetics. I've tried Kinetics before and was really happy with the formula so I got only more excited when trying this one.

Kinetics My Blue Heaven

My Blue Heaven is a dusty medium blue creme and it's already one of my favourites. Who can resist a polish like this?! The formula didn't disappoint me either: it went on very smooth and after two coats it was opaque. Normally I don't grab two (or more) coaters when I'm in a hurry but I think I'll grab this one for sure.

This polish was sent to me for a review by Alice & Jo's, a Dutch web shop that sells Kinetics for €5,79. They ship internationally and if you have any questions you can always contact them. They also carry other brands such as Art de Lautrec and Sleek so it's definitely worth of having a peek.

Have a great day!

OPI - Have You Seen my Limo?

Thursday, July 15, 2010
Hi everyone! How are you all doing? I'm having a bit of a headache the past two days, not sure where it comes from but it sucks so hopefully it'll be over soon. For today I want to show you OPI's Have You Seen my Limo?. I have ordered this one a while ago on Ebay and forgot about it until I found it back recently.

OPI Have You Seen my Limo? Holiday in Hollywood 2007

Have You Seen my Limo? is from OPI's Holiday in Hollywood Collection (holiday 2007). I like this shade the best out of the collection, it's the most unique in my opinion. Have You Seen my Limo? has a deep purple base with silver and green shimmer. It's a fab duochrome, it turns from reddish purple to greenish plum.

OPI Have You Seen my Limo? Holiday in Hollywood 2007

Application was fine. It took three coats to be opaque and that's a good thing because I thought it would be pretty sheer, you know I don't like sheers. After finding out this polish looks so darn good I smack myself on the head - I really need to USE polishes instead of looking at them. 

Have a nice day!

SpaRitual - Optical Illusion

Wednesday, July 14, 2010
Hi everyone! Not so long ago I got my first SpaRitual polish. I picked Optical Illusion for this precious moment of receiving a brand you've never tried. It didn't disappoint me at all - it's gorgeous! Therefore here's a warning: a little bit of picture spamming from my side, at least more than I normally do.

SpaRitual Optical Illusion

SpaRitual Optical Illusion

SpaRitual Optical Illusion

SpaRitual Optical Illusion

I don't own anything that looks like this, it's unique and gorgeous. Optical Illusion has an olive green base and is packed with gold, green and blue glitters. The gold pops out and sometimes you see a blue flash gliding over your nail. It's not an illusion but it's darn cool! Applying this was great - the brush and cap are easy to handle and with thin coats this polish was opaque in three coats. Drying time was quite fast. This one is definitely something!

Would you wear a funky looking green like this or would you pass?

Misa - Toxic Seduction

Tuesday, July 13, 2010
Hi dear readers! I picked a polish out of my untrieds yesterday because I saw this pretty on a blog. And man, is she gorgeous!

Misa Toxic Seduction fall 2008 Poisoned Passion Collection
Misa Toxic Seduction in daylight, two coats

Toxic Seduction is from Misa's Poisoned Passion collection (fall 2008). It's a blackened green shimmer and I can't tell you anything else except that application was good, it was opaque in two coats and I'm in love with this polish. So, that's it. I'm going to stare at my nails for a while now.

Have a nice day!

Nail Art Tutorial: Crazy Leopard (Konad)

Monday, July 12, 2010
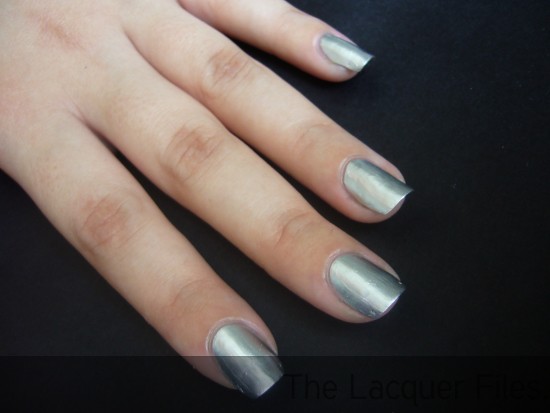
Hi all! A while ago I've showed you a leopard mani and a couple of readers requested a tutorial for it, so here it is! It isn't difficult but you have to have some patience. You can create the leopard spots freehand but I used konad. If you're having troubles with konad or you don't know how to use it, I'm really suggesting you take a look at the how to that Michèle created. You can find it here.

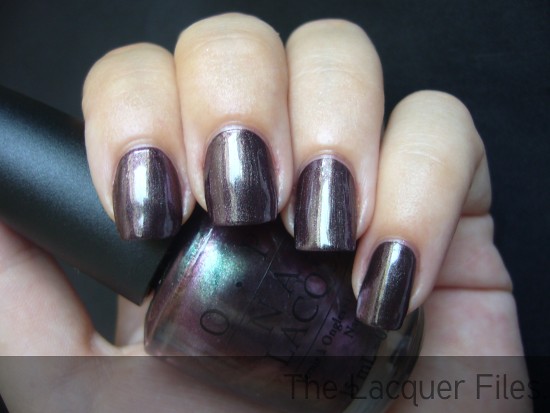
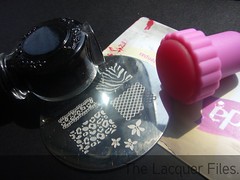
Before you start it's definitely a good idea of getting all the stuff you need and keep it right in front of you.

Leopard Konad Imageplate M57 Nail Art Design Nail Art Tutorial Leopard Konad Imageplate M57 Nail Art Design Nail Art Tutorial

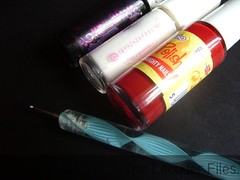
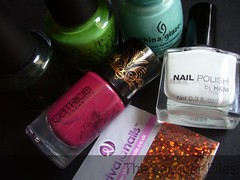
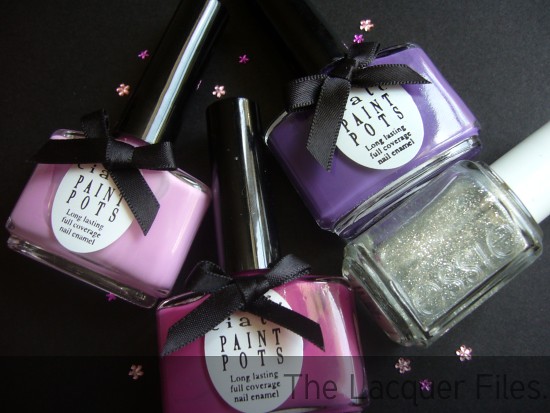
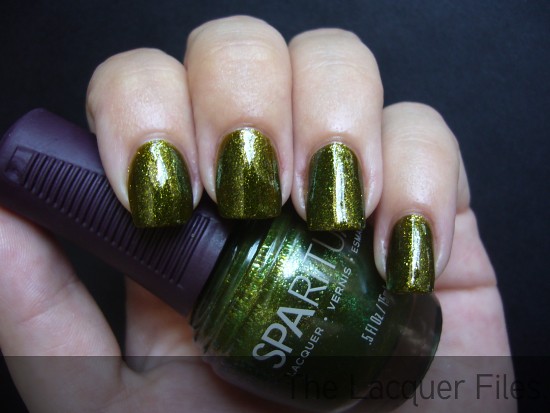
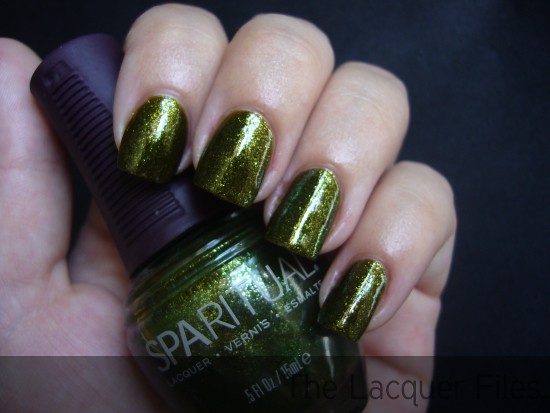
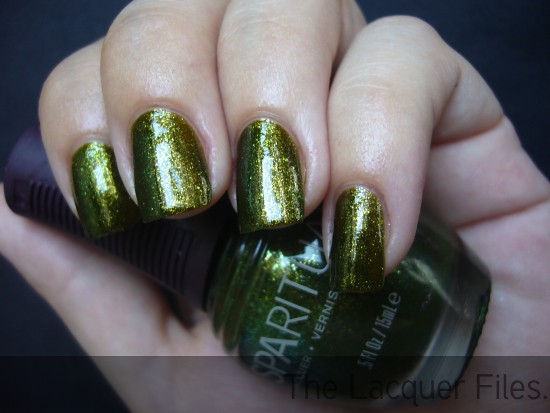
As you can see I'm using black konad stamping polish for this, but you can also use your good pigmented regular polish. I'm not using the konad metal scraped because that can cause a damaged plate, instead I use an old plastic card. The leopard design is found on konad plate M57 and last but not least, you'll need a stamp. The picture next to it shows the polishes I'm using to colour in the spots: Color Club Almost Famous, Essie Pretty Edgy, Zoya Robyn and Ciaté Main Stage.

Leopard Konad Imageplate M57 Nail Art Design Nail Art Tutorial
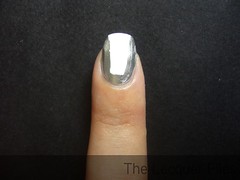
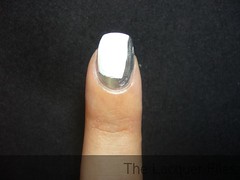
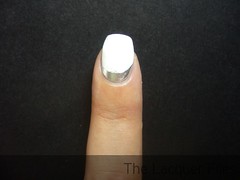
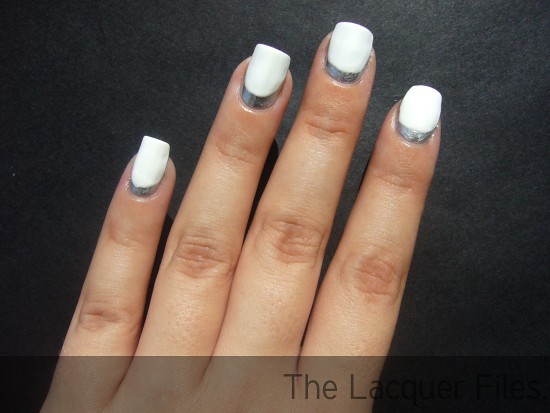
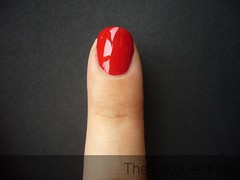
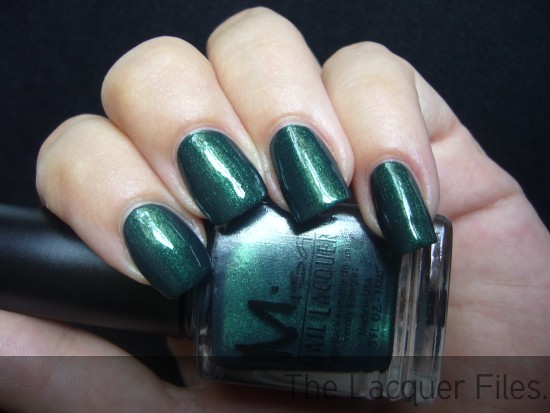
Before anything potentially dangerous happens we're just starting with the known routine. Use your base coat and pick out a nice base colour. I'm using H&M's Love at First Sight, a white creme that gives good coverage.

After that you can relax. Let the polish dry completely. If you don't you'll press the polish aside when using konad and this will create some messy nails. You can also use a quick dry top coat if you haven't got the patience for this. :o)

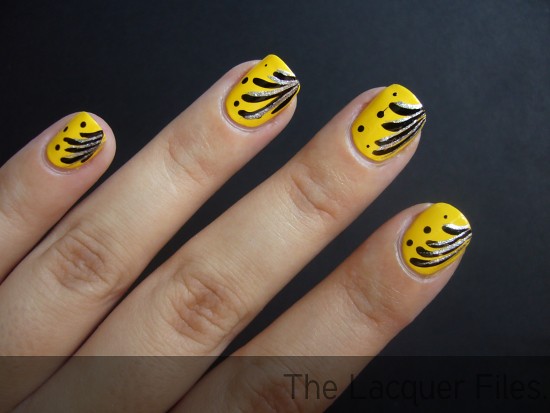
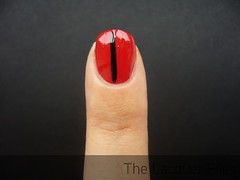
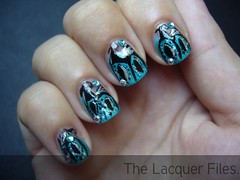
After that it's time to get out your konad stuff! As you can see in Michèle's tutorial, it really isn't that hard. It might take a little bit of practice but you'll get the feeling quickly enough. I always clean the plate and stamp for using it with a cotton pad and polish remover. So, we're starting. Put a little bit of the polish you're using on the design (you don't have to fill up the entire design unless you want to do that) and scrape the polish over the entire design. Make sure every tiny bit of the design is covered! Pick up the polish with the stamp and make a circular motion over your nail. This is quite hard to do for some so if it doesn't work out the first time, don't be disappointed! You have to experiment with this. It could be your pressing too hard on the plate, or too soft, or you're using the wrong polish. Once you've done one nail, you can start with the others. I always clean my plate and stamp after doing one nail, also with a cotton pad and polish remover. If you're scared of ruining your manicure you can use tweezers to grab the cotton pad. The result:

Leopard Konad Imageplate M57 Nail Art Design Nail Art Tutorial

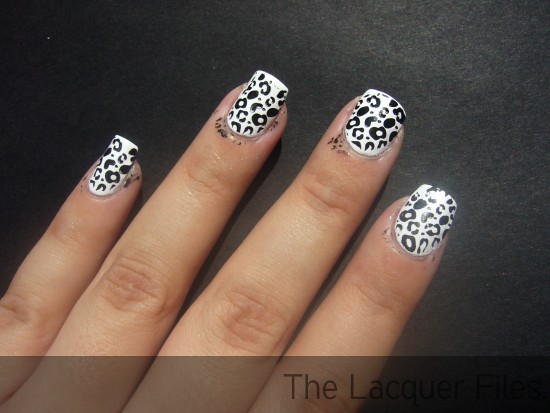
The design was too big for my nails and I stamped over my cuticles and fingers. This isn't awful, you can remove this when doing the last clean up. Since I'm really picky and I hate messy fingers I always do a clean up after stamping - but this is really your call. It's definitely not necessary.

Leopard Konad Imageplate M57 Nail Art Design Nail Art Tutorial
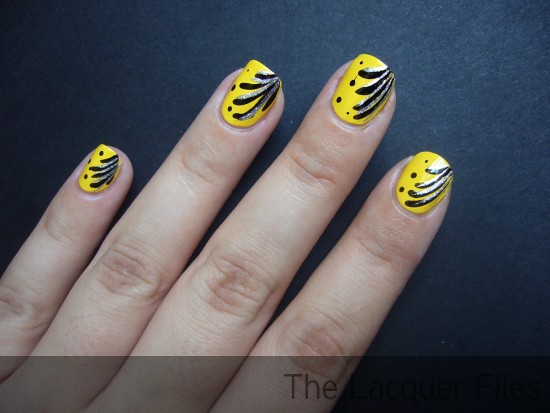
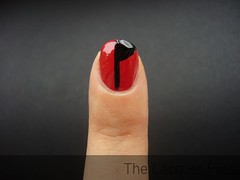
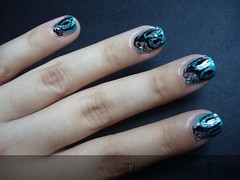
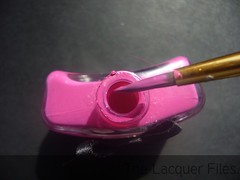
Done with the konad? Then we're going to colour the spots! You can use a striper for this but I'm using a pointy brush that I picked up in a dollar store. Brushes for this don't have to be expensive!

I'm also picking up the polish right from the bottle. You might not want to do that so you can also use a piece of paper or a bowl where you can pick up the polish. Use the tip of the brush to colour the spots and be gentle, you don't want to have a huuuuuge blob of polish there.

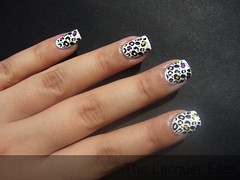
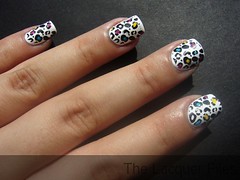
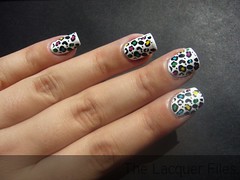
The pictures below show you the process of creating these coloured spots. I'm always using the same brush but after using one colour I rinse and clean it with acetone remover. You can click these, and all other pictures in this post, for an enlargement.

Leopard Konad Imageplate M57 Nail Art Design Nail Art Tutorial Leopard Konad Imageplate M57 Nail Art Design Nail Art Tutorial

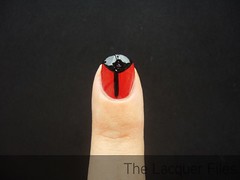
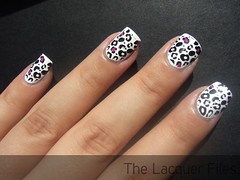
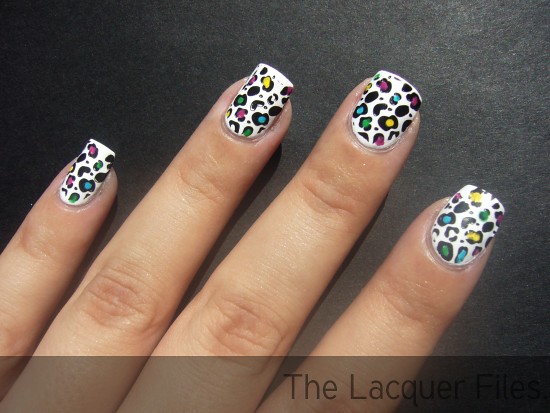
For the finishing touch, use top coat. You can use the konad top coat so that the stamping polish won't smudge but I don't own it so I'm using my trustworthy Nubar Diamont. If you're not using the konad top coat be careful! You want to apply it in a floating way so the brush doesn't touch your nail. Voila! Finished!

Leopard Konad Imageplate M57 Nail Art Design Nail Art Tutorial

Hope this was helpful! Have a nice day!
© The Lacquer Files | Disclaimer | Want to use my content? Email me first!

This work is licensed under a Creative Commons Attribution-NonCommercial-NoDerivs 3.0 Unported License.