


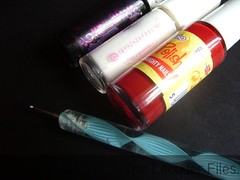
 For this manicure you need a red polish, stripers in the colours black and white and a dotting tool. If you don't own a dotting tool you can always use a toothpick or a rosewood stick. The red polish I used is the Saucy polish from Eyeko, my stripers are the Essence Heavy Black and the white tippainter and my dotting tool comes from a web shop. Dotting tools are really handy and easy to use so I'd buy one, you'll never know when you feel like dotting up a manicure. There are lots of these available in the world wide web so be on the look out! They aren't expensive at all and a great addition to your nail art stuff.
On to creating the ladybugs! You create these in six easy steps. You can grasp it by only looking at the pictures but I'll give you an explanation by each step.
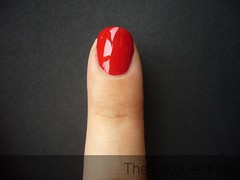
Step 1. After applying the base coat you'll paint your nails in red. This doesn't have to be super neat because you can always clean up your nails when you're done.
Applying the base coat is very important, especially when you're using pigmented polishes like this Eyeko one. You don't want to end up with crazy stained nails, do you? For a clear and good guide on how to do your clean up, please have a look at Lacquerized, Michèle has a great one.
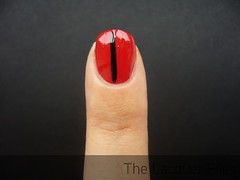
Step 2. When your nail polish is dry you can start using your black striper. Draw a line from the lower centre of your nail upwards. This is also easy to do but make sure the hand you're using rests on a table. This way your wrist is leaning on something and that makes it less shaky. The reason you want your nail polish dry before using the striper is that if it's not, you can pull the just applied nail polish off the nail.
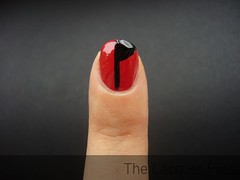
Step 3. Draw a line with your striper above the middle of the vertical line. You want to draw this towards the upper right corner of your nail so don't draw a straight line: make it go upwards. After that you can colour in the red, making a black square.
Step 4. Repeat step 3 only with the other side of your nail.
Step 5. Use your dotting tool to create random black dots on your nail. I always use a paper where I can drop a little polish on and dip my dotting tool in there.
Step 6. You do the same for the eyes except you're doing this with white polish.
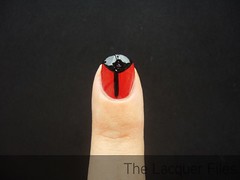
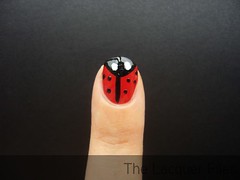
And... Done! Below are the pictures to make my text more clear. You can click these for an enlargement.

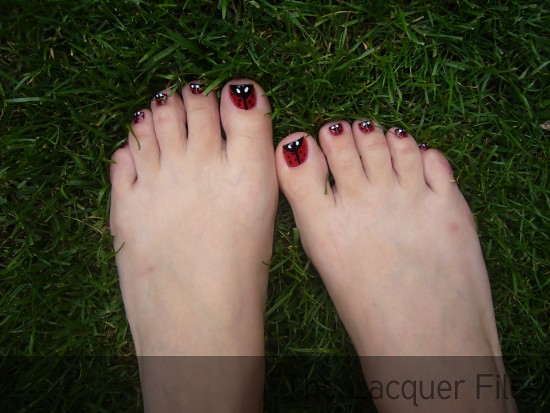
Seal your design with topcoat and you'll have a few days of pleasure looking at your nails. Now I could show you my fingernails, but I'm not. I like this design as my pedicure and that is what I'll be showing. The first time I'm showing my feet here and if you don't like feet: don't watch it then.
Hope this was helpful!